Pages

Tuesday, February 26, 2013

Gnocchi Chicken Minestrone


I, my friends, am just hours away from leaving this sunny place I live in, to head to yet another sunny place, that is Southern California!  We are taking our kids on a last minute surprise trip to Disneyland and I could not be more excited!  Mostly I can't wait to see their sweet faces tomorrow morning when they realize where we are and what we are doing!  If this trip had not been planned last minute, I never would have been able to keep it from them!  I have just about spilled the beans a dozen or more times!  Speaking of beans, I have a tasty soup to share with you today, chalk full of hearty and healthy things like beans, peppers, zucchini, chicken breasts, peas, and potato gnocchi.  In case you are not privy as to where in the grocery store gnocchi is found, as I was not, you can find look for it in the pasta or frozen foods section.  So for those of you who are not leaving one sunny place for another, and are still stuck behind closed doors because of freezing temperatures and/or inches of snow, (I'm talking to you my hometown folks in good old Pocatello, Idaho), then this soup is for you!  Served up with some Parmesan bread sticks, this is the perfect cold-weather, comfort meal.  

PS...I have heard so much about the fantastic food at Disneyland, and even though I have been there more than half a dozen times, I have yet to discover any of these culinary treasures.  Does anyone have any recommendations for must-eat meals or restaurants in Disneyland?!  Please let me in on any secrets you might have!!  Thanks a million!  


Gnocchi Chicken Minestrone

1-1/4 pounds chicken tenderloins or breasts, cut into 1/2 inch pieces
3/4 teaspoon dried oregano
1/4 teaspoon salt
1/4 teaspoon pepper
2 Tablespoons olive oil, divided
1 small green pepper
1 small red pepper
1 small yellow pepper
1 medium zucchini, finely chopped
1/3 cup chopped red onions
1/3 cup chopped prosciutto or deli ham
4 garlic cloves, minced
2 cans (14.5 ounce each) chicken broth
1 can (14.5 ounce) Italian diced tomatoes, undrained
3.4 cup canned white or kidney or cannellini beans, rinsed and drained
1/2 cup frozen peas
3 Tablespoons tomato paste
1 package (16 ounce) potato gnocchi
1/2 cup shredded Asiago or Italian blend cheese
8 fresh basil leaves, thinly sliced

Sprinkle chicken with oregano, salt and pepper.  In a skillet, saute chicken in 1 Tablespoon oil until no longer pink.  Remove from pan and set aside.  In the same pan, cook the peppers, zucchini and onion in remaining oil until tender.  Add prosciutto and garlic, and cook 1 minute longer.  Transfer vegetables to a soup pot.  Add the broth, tomatoes, beans, peas and tomato paste and chicken.  Bring to a boil. Reduce heat and simmer, uncovered for 20 minutes, stirring occasionally.  
Meanwhile, cook gnocchi according to package directions.  Drain and stir into soup.  Garnish each serving with cheese and basil.  

Recipe Source:  Adapted from Taste of Home

I like to link up to some fun parties!  Check them out here!

Sunday, February 24, 2013

Coffee Cake Muffins

It is very unlike me to post two sweet treats right in a row.  However, these muffins were just so amazingly delicious, that I thought it would be quite unfair of me not to share them with you as soon as possible!  Coffee cake is one of my most favorite things in the whole world!  Anything topped with streusel is a-ok with me!  So when I found the recipe for these muffins that not only had a an amazingly delicious pecan streusel topping, but also had a ribbon of streusel tucked inside, I knew I had to make them immediately.  After my husband ate one of these this afternoon, he declared them the best muffin I have ever made!  I won't divulge to you how many of these things I ate because I would be embarrassed, but I am telling you that you should make them right away.  They were so so good.

Coffee Cake Muffins

Makes 12 muffins (I actually only got about 9 but I made mine pretty big)

Streusel topping:
3 Tablespoons all-purpose flour
3 Tablespoons brown sugar
1/4 teaspoon ground cinnamon
2 tablespoons butter or margarine
3 tablespoons chopped walnuts or pecans

Muffins:
1-1/2 cups all-purpose flour
1/2 cup granulated sugar
1-1/4 teaspoons baking powder
1/2 teaspoon ground cinnamon
1/4 teaspoon ground ginger
1/4 teaspoon baking soda
1/4 teaspoon salt
1/4 cup butter or margarine
1 beaten egg
1/2 cup buttermilk

Preheat oven to 400 degrees.  Grease twelve muffin cups or line with paper baking cups and set aside.  For topping, in a small bowl stir together the 3 tablespoons flour, brown sugar and the 1/4 teaspoon cinnamon.  Cut in the 2 tablespoons butter until mixture resembles coarse crumbs.  Stir in the nuts, set topping aside.

In a medium bowl, stir together the 1-1/2 cups flour, granulate sugar, baking powder, the 1/2 teaspoon cinnamon, ginger, baking soda and salt.  Cut in the 1/4 cup butter until mixture resembles coarse crumbs.  

In another bowl, combine egg and buttermilk.  Add egg mixture all at once to flour mixture.  Stir just until moistened (batter should be lumpy and pretty sticky).

Spoon half of the batter into the prepared muffin cups, filling each one-third full.  Top with half of the streusel topping, then the remaining batter and the remaining topping.  Bake for 15 to 18 minutes or until golden and a wooden toothpick inserted in center comes out clean.  Cool in muffin cups on wire rack for 5 minutes.  Remove from muffin cups, serve warm.

Recipe Source:  Better Homes and Gardens
I'm linking this recipe up here!

Thursday, February 21, 2013

Caramel Apple Pizza

Let's talk favorites here for a minute.  Have you ever been to a favorite things party?  Tonight I attended my second one ever.  They are great.  Let me tell you about them just in case you haven't been.  Each party-goer picks something that is their favorite, then purchases 5 of that item.  Our limit tonight was $5, but it could be set either higher or lower.  Then each person puts their name into a box 5 times.  The box is passed around the room to each person and when it arrives in your lap, you explain a little about your favorite item, draw out 5 names and hand over your favorite thing to each of those 5 people.  So each person leaves the party with 5 different things!  So fun!  I left with some real treasures tonight!  If you haven't been to one of these parties, you should totally throw one yourself.  They are a blast!  So I took some fun Ikea kitchen tools as my favorite items tonight.  But another favorite that I have is pizza.  Even after working at 2 different pizza restaurants for a combined total of nearly a decade, I could still eat it just about everyday!  I have another favorite...sugary sweets.  I am truly a sucker for anything packed with sugar.  This caramel apple pizza, though not your traditional pizza, fits the bill for both of my favorites.  Its a little twist on a classic favorite.  I made this for the favorite things party tonight.  You should make it for yours...that I know you are going to throw...because by now I have convinced you of how fun they are and you are dying to do it...right?!

Caramel Apple Pizza

*If you are like me and do not keep pastry flour around the house, fear not, you can easily substitute all purpose flour.  Just place 2 tablespoons of cornstarch into a 1-cup measuring cup.  Fill the rest with all purpose flour.  Sift the mixture into a bowl or onto a plate and then take your 1 cup of flour from that. That simply replaces the 1-cup whole wheat pastry flour, so make sure you still add the 3/4 cup all purpose flour as well, giving you a grand total of 1-3/4 cup flour.  Also, as I was taking this to a party I wanted to make sure my apples didn't turn brown.  There are a variety of ways to stop that from happening, but I just soaked mine in some lemon water and that worked perfectly.

Crust
3/4 cup butter, softened
1/4 cup sugar
1/4 cup packed brown sugar
1 egg
2 Tablespoons canola oil
1 Tablespoon light corn syrup
1 teaspoon vanilla extract
1 cup whole wheat pastry flour
3/4 cup all-purpose flour
1/2 teaspoon baking powder
1/4 teaspoon salt
1/4 teaspoon ground cinnamon

Topping
1 package (8 ounce) cream cheese
1/4 cup packed brown sugar
1/2 teaspoon ground cinnamon
1/2 teaspoon vanilla extract
3 medium granny smith apples, thinly sliced
1/4 cup caramel ice cream topping
1/4 cup chopped unsalted dry roasted peanuts

Preheat the oven to 350 degrees and grease a 140-inch pizza pan.  In a large bowl, cream butter and sugars until light and fluffy.  Beat in the egg, oil, corn syrup and vanilla.  In a medium size bowl, combine the flours, baking powder, salt and cinnamon.  Gradually add to creamed mixture and mix well.  Press dough onto a the pizza pan.  Bake for 12-15 minutes or until lightly browned.  Cool on a wire rack.  In a small bowl, beat the cream cheese, brown sugar, cinnamon and vanilla until smooth.  Spread over crust.  Arrange apples over the top.  Drizzle with caramel topping and sprinkle with peanuts.  Serve immediately.

Recipe Source:  Taste of Home Appetizers

I'm linking up at these parties!  Go check them out!

Tuesday, February 19, 2013

Rosemary & Garlic Pork Tenderloin

I have only recently discovered my love of the pork tenderloin.  For the longest time, I thought I was being locked out of some super secret club that knew something about pork tenderloin that I didn't.  I read recipe after recipe, blog post after blog post, about this favorite cut of meat that was not only lean, but also so tender and so delicious.  My experience in cooking a pork tenderloin had yielded a very different opinion than the aforementioned ones.  The only time I had ever cooked a tenderloin was many years ago, when I found a pre-marinaded one in the less than stellar meat section of a Walmart.  Not only was the marinade horrible and salty, I had overcooked it so the meat was dry and tough.  I had diligently avoided them since.   But after so many rave reviews on some of my favorite sites like Mel's Kitchen Cafe and Our Best Bites, blogs run by ladies whom I trust greatly when it comes to food, I decided to give it another go.  And I was smitten!  If cooked correctly, a tenderloin can give you the most moist, tender and flavorful, lean meat experience.  I have tried no less than 5 pork tenderloin recipes in the last 2 months and I have loved each and every one.  The pork tenderloin is so versatile and adaptable.  This recipe is the latest great one we have enjoyed in our home.  It is full of flavor, has only a few simple ingredients and comes together in a matter of minutes.  I served this with roasted asparagus and boiled and buttered red potatoes, and it was a perfect Sunday evening meal.  However, its so fast and easy that it would make a fabulous week night meal as well.

Rosemary & Garlic Pork Tenderloin

*Pork tenderloins generally come packaged by two's.  This recipe is for one 1-pound tenderloin but can be easily doubled to make both tenderloins.  

2 Tablespoons finely chopped fresh rosemary
4 garlic cloves, minced
1 (1 pound) pork tenderloin
1/2 teaspoon salt
1/4 teaspoon black pepper

Preheat oven to 475 degrees.  Combine rosemary and garlic.  Make several 1/2 inch deep slits in pork tenderloin.  Place about half of the rosemary and garlic mixture in the slits.  Rub the remaining mixture over the pork.  Sprinkle with salt and pepper.  Coat a jelly roll pan or roasting dish with cooking spray.  Place pork on the pan and insert a meat thermometer into the thickest portion of the pork.  Bake for 20 minutes or until thermometer registers 160 degrees (meat will still be slightly pink) or to a desired degree of doneness.  Let stand 5 minutes, and cut into 1/4 inch thick slices.

Recipe Source:  Cooking Light

I am linking up to these great parties!

Sunday, February 17, 2013

Sausage & Egg Breakfast Casserole

 A great many years ago, I attended a slumber party at a friend's home.  For breakfast the next morning, her mom served us this foreign (to me) dish called a breakfast pizza.  I don't remember anything about it except the eggs...lots and lots of eggs.  It was saturated with them.  I thought it was horrible.  I left her house that morning feeling absolutely sick to my stomach and, in my young girl naivety, sure that I was allergic to eggs.  I wouldn't eat eggs for years and even as a young adult, got nauseous even thinking about that breakfast pizza.  Then I met my husband who was an egg lover, and though for awhile I still maintained that I was an egg hater, I found myself sneaking bites of his scrambled eggs topped with cheese every now and again.  It took me awhile, but I found that I actually do really enjoy scrambled eggs with melted cheese and I can also do a sunny-side-up egg on a breakfast sandwich.  However, I still can't do anything that I find to be too egg-y...even french toast is hard for me.  So when I went to a brunch at a friend's house and she was serving a breakfast casserole, as the main dish, I started feeling a bit squeamish thinking about eating it.  After one bite though, I was in love!  Strange thing, considering my supposed dislike of not only eggs, but sausage as well.  But it really was delicious and I even went back for seconds.  I had to have the recipe and this is it!  Thanks to the addition of the hash browns, there is enough substance and heartiness that it isn't egg-y at all...if you know what I mean.  I am totally sold on this recipe.  I even made it for dinner the other night and served it along side this orange juice fruit salad.  It was a perfect dinner (if you love breakfast for dinner..which I think is pretty much the best thing ever!)!

Sausage & Egg Breakfast Casserole

1 26 ounce bag shredded hash browns
1/2 cup butter
12 ounces grated cheese (I used a mix of cheddar and monterey jack)
1 small can diced green chiles
2 cups cooked sausage (I have used pork and turkey sausage before, both with good results)
6 eggs
1 cup milk
1/2 teaspoon salt

Preheat oven to 350 degrees.  Grease a 9x13 inch pan.  In a large bowl, combine hash browns, grated cheese, diced chiles and cooked sausage.  Spread into greased pan.  Cut butter into small slices and place all over the top of the casserole.  In a medium size bowl, combine eggs, milk and salt.  Whisk until eggs are beaten.  Pour into the pan over the hash brown mixture.  Place in oven and bake for 1 hour.  Serve warm.

Recipe Source:  Adapted from a recipe contained in an old church recipe book sent to me by a friend


This recipe can be found linked up to these great link parties!

Friday, February 15, 2013

Chicken Stew with Balsamic Roasted Vegetables


We had another dip in temperature to the 50's this past week.  I know some people here in the Phoenix valley think that is just way too cold and are about sick of this chillier weather that we have been having this winter.  I, however, could not love it more!  Every time I check the 7 day forecast on my phone and see that it is still in the 60's, my heart does a tiny leap of happiness.  I am not ready for the rise in temps that will be coming to us in the next few months.  I shouldn't be living in fear of the heat, but I do.  Anyhow, if it is in the 50's, I will undoubtedly be making soup (I'm sure there are many of you in much colder climates rolling your eyes right now that I am calling the 50's soup/winter weather... sorry).  This was the soup of choice this past week and it was incredibly delicious.  It was hearty, filling and so so flavorful.  This was my first foray into the world of stew preparation (unless you count heating up a can of Campbell's beef stew...which I used to do...a whole lot), and it turned out wonderfully!  It was also the first time I have had a stew that didn't have beef in it, and the change was really nice.  
This soup might seem like a big task because of the vegetable roasting step, however, I made this in the afternoon while my little girl napped, and then I just put it in the fridge until dinner time.  I pulled it out, heated on medium-high for about 10 minutes and it was good to go and so perfect... until we were interrupted by a realtor at our door asking if he could show our for-sale home to some clients.  I had to pull my kid's bowls out from under them and dump it back in the soup pot.  But again, 30 minutes later, when I had to heat it for the 3rd time, it was still perfect!  So this definitely falls in the make-ahead category.  This is totally going into our tried-and-true soup folder.  It is a perfect dinner for a cold night!

Chicken Stew with Balsamic Roasted Vegetables

*Though the recipe says to use 3 chicken breasts and 3 thighs, feel free to use whatever chicken you have on hand or feel like using.  The original recipe called for 6 breasts, but recommended using 1/2 and 1/2 to make it more economical.  I love thighs so that is what I went for and I loved that each bite was a little bit different.  If you want to use all thighs, or all breasts, go for it...I think it would be great any way.

4 cups unpeeled, cubed red potatoes (3/4-inch cubes)
2 cups whole baby carrots
1 cup coarsely chopped red onion
2 Tablespoon balsamic vinegar
1 Tablespoon Olive Oil
1 teaspoon minced garlic
1-1/2 teaspoon dried thyme, divided
1-1/2 teaspoon dried rosemary, divided
1 teaspoon dried tarragon
1/2 teaspoon salt
1/2 teaspoon black pepper
1 cup sliced fresh green beans
3 boneless skinless chicken breasts (1 pound), cut into 1 inch cubes
3 boneless skinless chicken thighs (1 pound), cut into 1 inch cubes
3-1/2 to 4 cups reduced-sodium chicken broth, divided
2 Tablespoon cornstarch

Preheat oven to 425 degrees.  Spray a large roasting pan with cooking spray.  Add potatoes, carrots, onion, vinegar, oil, garlic, 1 teaspoon thyme, 1 teaspoon rosemary, tarragon, salt and pepper.  Mix well.  Roast, uncovered for 15 minutes. Stir vegetables and roast for another 15 minutes.  Add green beans, and roast for 10 more minutes.  

Meanwhile, pour 1/2 cup chicken broth into a large soup pot.  Add remaining 1/2 teaspoon thyme and 1/2 teaspoon rosemary.  Bring to a boil.  Add chicken pieces and reduce heat to medium-high.  Cook uncovered, until chicken is cooked through, about 12 minutes.  Add roasted vegetables to chicken and broth.  Stir in 2-1/2 to 3 cups chicken broth (depending on how much liquid you want.  I will add more broth next time to make it soupier).  In a small bowl, combine cornstarch with 1/2 cup broth and stir until lump free.  Add cornstarch mixture to chicken and vegetables.  Cook until stew is bubbly and has thickened, about 3 minutes.  

Recipe Source:  Adapted from Taste of Home


I am linking this tasty soup up to these link parties!

Wednesday, February 13, 2013

Apple-Brined Chicken Thighs

I came across this recipe several years ago, but the word 'brined' scared me right away.  I had no idea what that meant and it seemed much too complicated for me, so I just skipped right over it.  But during the last holiday season, I heard so much about how amazing a brined turkey was, I knew I had to try it.  So after learning that brining is actually really nothing more than marinading your meat in a mixture full of salt,  I brined myself a turkey, and it turned out great!  So when I re-discovered this recipe the other day, and I saw that 'brined word',  I knew I could handle it.  The original recipe instructed to throw some beans into a roasting pan before nesting the chicken thighs amongst them and cooking it all together.  I cooked this up for our Sunday dinner last week, took it out of the oven, staged my pictures and then grabbed a green bean to do my taste test.  I could have cried...they were horrible!  They weren't completely cooked, but that was the least of their issues.  The flavor was just dreadful and so strong and it was tough for me to even choke them down.  So as we sat down to dinner, I gave my husband the cautionary warning that this dinner was probably a major fail.  Then we each took our first bites and it turns out there was nothing to be worried about!  We were so very pleasantly pleased with the chicken!!  It was not only super simple to prepare, but it was some of the most amazingly flavorful, tender and delicious chicken I have ever made!  I was so glad that the awful beans were not a pre-cursor to the rest of the meal.  My whole family loved this chicken!  Even my non-eating children ate this!  This is a definite must-make again...without the beans....definitely no beans. 

Apple Brined Chicken Thighs

3 cups apple cider or juice
1 medium onion, sliced
1 medium lemon, sliced
4 fresh rosemary sprigs
1/3 cup kosher salt
1/2 cup packed brown sugar, divided
4 garlic cloves, minced
1 bay leaf
1 teaspoon whole peppercorns (I just used 1 teaspoon pepper because I didn't have any)
2 cups cold water
10 chicken thighs (original recipe said bone in...I used boneless with fantastic results!)
1 2-gallon resealable plastic bag
3 medium tart apples, cut into wedges
1 Tablespoon minced fresh Rosemary or 1 teaspoon dried rosemary, crushed
1 Tablespoon olive oil
1/4 teaspoon pepper

In a pot, combine the cider, onion, lemon, rosemary sprigs, salt, 14 cup brown sugar, garlic, bay leaf and peppercorns.  Bring to a boil.  Cook and stir until the salt and brown sugar are dissolved.  Remove from the heat; stir in water.  Cool brine to room temperature.
Place chicken in the 2-gallon resealable plastic bag.  Carefully pour cooled brine into bag.  Squeeze out as much air as possible, seal bag and turn to coat.  Place in a roasting pan.  Refrigerate for 2 hours, turning occasionally.
Preheat oven to 400 degrees and grease a roasting pan.  Place apple wedges in greased roasting pan.  Drain chicken and place in prepared pan  Bake, uncovered for 40 minutes.
Combine the minced rosemary, oil, pepper and remaining brown sugar.  Sprinkle over chicken. Bake 15-25 minutes longer or until a meat thermometer reads 180 degrees.  Discard apples and serve chicken. 

Recipe Source:  Adapted from Taste of Home


I am linking up at these fantastic blogs!

Sunday, February 10, 2013

White Chocolate Raspberry Torte

Well, here is the final dessert in my Valentine's Day Dessert series.  This one was maybe my favorite of the three.  I have mentioned before that I ADORE white chocolate.  So obviously I was sold on this dessert before I even made it.  I had planned on making this for my upcoming birthday dessert (yes, I make my own birthday dessert...not because my husband wouldn't do it for because he totally would, but because I really love doing it!), but then we were invited to a couple's game night last weekend and were instructed to bring a Valentine treat.  This just screamed Valentine's Day to me, so it was bumped on the to-be-made schedule.  Now one thing I must mention about this little dessert.  The cake is good.  The melted white chocolate and buttermilk make it a very dense and heavy cake, which is delicious, but as a stand alone, I wouldn't be jumping up and down about it.  The real show stopper here is the frosting!  Oh my goodness!  I could (and did) just eat it by the spoonful!!  It is what makes this cake what it is...insanely delicious!  Think cream cheese, whipped cream and more white chocolate!!  Oh it is heaven!  The whole thing comes together much easier than it looks and would be the perfect follow up to your Valentine's Day meal (or any meal for that matter!)!

White Chocolate Raspberry Torte 

*When you make up the frosting, it is going to seem like there is a ton of it!  I thought that and so I did not use all of the frosting.  Big mistake!!  Because of how dense and heavy the cake is, it can handle (and quite frankly needs) the extra frosting.  I promise it will not be too much...so use it up!  Like I said, it is the best part and you will be so glad you have it on there!  Also, I do not ever have cake flour on hand.  Instead I filled a measuring cup with 2 tablespoons of cornstarch and the rest with flour.  I did this 3 times and then sifted the flour onto parchment paper.  Then I measure the 3 cups of flour that I needed flour from that mixture...it worked perfectly!

Cake:
3/4 cup butter
2 cups sugar
4 eggs
1 cup white baking chips, melted and cooled
1 teaspoon vanilla extract
3 cups cake flour (Or mixture of all purpose flour & cornstarch...see above note)
1 teaspoon baking powder
1/2 teaspoon baking soda
1 cup buttermilk

Filling:
2 cups fresh or frozen raspberries (I used frozen and it worked wonderfully)
3/4 cup water
1/2 cup sugar
3 Tablespoons cornstarch

Frosting:
1 package (8 ounce) cream cheese (I used 1/3 less fat with fantastic results)
1 cup vanilla or white chocolate chips, melted and cooled
12 ounces frozen whipped topping, thawed
Fresh Raspberries for garnishing, optional

Preheat oven to 350 degrees.  Grease and flour 2 9-inch round baking pans and set aside.  Cream butter and sugar until fluffy.  Add eggs, one at a time, beating well after each addition.  Beat in melted chips and vanilla.  Combine flour, baking powder and soda and add to creamed mixture alternately with buttermilk, beating well after each addition.

Pour the batter evenly into prepared baking pans.  Bake for 28-32 minutes or until a toothpick comes out clean.  Cool 10 minutes before removing from pans to wire racks to cool completely.

In a small saucepan, bring raspberries and water to a boil.  Reduce heat and simmer for 5 minutes.  Strain raspberry mixture into a bowl and discard the seeds.  Cool.  In the same pan, combine sugar and cornstarch.  Stir in raspberry puree until smooth.  Bring to a boil.  Cook and stir for 2 minutes or until thickened.  Cool. Spread between cake layers.

In a large bowl, beat cream cheese until fluffy.  Beat in melted chips and fold in whipped topping.  Spread over the top and sides of cake.  Reserve some frosting to pipe over the top edge of cake with a pastry bag (obviously that is optional, you can just spread all of the frosting over the cake top and sides if desired).  Garnish with berries if desired.  Store in refrigerator, but I definitely recommend allowing it to warm up a bit before serving.

Recipe Source:  Taste of Home
I am linking up at these fantastic blogs!

Friday, February 8, 2013

Texas Pork Burritos

Allow me, for a minute, to take a break from the beautiful desserts of Valentine's day, to tell you about this mighty flavorful, tender, savory, delicious meal that I stumbled upon this week.  Seriously, it is tasty.  I found this recipe in an old magazine that I have been keeping around, and decided to give it a go earlier this week.  It was a hit!  Which was a good thing for my ego after 2 major dinner flops the previous days.  I don't know about you, but when I think about a pork burrito, I only ever thing of the sweet version served at restaurants such as Cafe Rio or Costa Vida.  Now, as totally delectable as that is (in my opinion, not my husband's...he hates Cafe Rio!!!  Is he a weirdo or what?!), this was delightfully different.  It has a few surprise ingredients like carrots, onions and olives (well, we left those out because I DESPISE the little black creatures), that somehow work perfectly in this dish!  I definitely recommend you try this very soon!  I served it as an easy weeknight dinner as it utilizes the slow cooker (yay!), but it could definitely pass as a fancier Sunday night dinner or for your dinner guests.  

Texas Pork Burritos
*Just a couple notes about this recipe.  The original recipe called for a pork shoulder roast.  I could not find anything but a gigantic one, and I definitely didn't need that.  So I bought a small 2 pound boneless pork rib roast and it worked perfectly.  I did cut all of the ingredients in half since it was much smaller.  Also, it was pre-salted which I didn't notice until after.  I would have cut the salt out in the recipe had I known, so check your roast for that or it may be a little too salty.  Also, the original recipe calls for olives and cilantro, so I included them here.  I hate olives so I left them out.  As much as I would have loved to have a heaping pile of fresh cilantro stirred into this, thanks to 2 glorious years lived in Venezuela, my husband will not touch the stuff (or smell it!) so I had to leave that out.  So add those 2 ingredients at your own risk...insert evil laugh here...just kidding.  I'm sure it will be fantastic with those as well, but I put optional in there next to them.  One last thing, the whole time we were eating this, I kept thinking how incredible it would be on homemade tortillas...so if you have the time (they are actually pretty easy), you might think about going that route.  If not, store bought will work great too! 

1 boneless pork shoulder or boneless pork rib roast (3 to 4 pounds)
1 teaspoon salt
1/2 teaspoon pepper
2 Tablespoons Canola Oil (I used Olive)
2 cans (10 ounce each) green enchilada sauce
1 large onion, thinly sliced
2 medium carrots, thinly sliced in half moons
2 cans (2-1/4 ounce each), sliced ripe olives, drained (Optional)
1/2 cup chicken broth
2 Tablespoons ground cumin
3 garlic cloves, minced
2 teaspoons dried oregano
2 Tablespoons all-purpose flour
1 cup (8 ounces) sour cream
1/2 cup minced fresh cilantro (Optional)
10 flour tortillas, warmed
2 cups (8 ounces) shredded Mexican cheese blend

Sprinkle pork with salt and pepper.  In a large skillet, brown meat in oil in batches (if necessary; mine was small enough that I didn't need to do it in batches).  Transfer to a slow cooker.  Combine the enchilada sauce, onion, carrots, olives, broth, cumin, garlic and oregano; pour over meat.  Cover and cook on low for 6-8 hours or until meat is tender.  
Remove the meat from the slow cooker and shred with 2 forks.  Combine the flour and sour cream in a small bowl.  Stir into meat mixture.  Return the shredded pork back to the slow cooker, cover and cook on high for 30 minutes or until thickened.  If using, stir in cilantro.
Spoon 2/3 cup pork mixture onto each tortilla, top with about 3 Tablespoons of cheese.  Roll up tightly and serve. 

Recipe Source:  Taste of Home

I am linking this and other tasty recipes up to these great blogs!  Check them out!

Thursday, February 7, 2013

Strawberry Creme Pudding Cookies

As mentioned in my last post for the Strawberry Cream Pie, I am sharing 2 more amazing and perfect for Valentine's Day desserts this week.  Before I get started on the recipe for these sweet little cookies, I must first publicly acknowledge the atrocity of these pictures.  I was off my game that day...big time.  I tried about a million different set-ups (poses doesn't seem like the right word when you are talking about cookies), but I just couldn't get the lighting (or anything) right with these!  It was putting my frustration level at an incredible high.  Now, I understand there is a an easy fix to that...make the cookies again and start over with the photo shoot.  Here's the deal...I can't make these again...because I don't think my hips and thighs can take another inhalation of a second batch.  That is right...I ate almost the whole entire batch of these cookies!  They were so amazingly delicious that I could not stop eating them!  I had made 2 small bags to give to some friends, but only one made it out the door that first day.  The second bag sat on my counter for another day and since my stash was gone and I was still feeling the intense need to eat these, I opened that up and ate those too!  Seriously.  I have problems.  So you see, I cannot make these again, because I will eat them...all of them.  Pudding cookies are my new favorite thing.  I had never used a box of pudding in cookies before, but after trying some several weeks ago, I have been thinking of lots of new combinations, and when I saw Strawberry Creme pudding at the grocery store, I knew I wanted to create a cookie utilizing it.  My most favorite type of chocolate is white, so it was a no brainer that I would throw some of that in there.  I thought these were just delightful!  I think you should make these, and I believe that  if you do make them, you just might excuse me for my sub-par pictures.
Strawberry Creme Pudding Cookies
*I added a few drops of red food coloring to my cookie dough.  I was hoping that the pudding itself would give the cookies an intense pink color...it didn't.  The food coloring didn't give it that either, but it did help them to be a little more on the pink side...still not what I was going for, but the taste was, so I figured that was okay.  So play with the color as much or as little as you would like.

1 cup butter, softened
1/2 cup brown sugar
1/2 sugar
2 eggs
3.4 ounce package instant Strawberry Creme pudding
1 teaspoon vanilla extract
2 1/4 cups all purpose flour
1 teaspoon baking soda
1/2 teaspoon salt
1-1/2 cups white chocolate chips

 Preheat oven to 350 degrees.  Prepare a baking sheet by lining with parchment paper, baking mat or by spraying it with cooking spray.  In a medium size bowl, or in the bowl of a stand-mixer, combine butter and sugars.  Mix until creamy.  Add in the eggs, vanilla and pudding and mix until well combined.  If you want to add food coloring, add it at this point and mix.  In a separate bowl, combine the flour, baking soda and salt. Whisk together and then add it to the pudding mixture.  Mix until the ingredients are combined.  Fold in the white chocolate chips.  Drop the dough by rounded tablespoon onto the prepared pan.  Bake for 10-12 minutes or until set.  Let cookies cool on the pan for several minutes before transferring them to a wire rack to cool completely.

Recipe Source:  Adapted from Two Peas and Their Pod 

Tuesday, February 5, 2013

Strawberry Cream Pie


Valentines Day is next week.  Did you know that?  I'm sure you did;  I'm sure everyone does.  I should have known that, but somehow it escaped my attention.  I don't know how that is possible, since everywhere I look its red velvet this, and heart shaped that (which I love!).  Not to mention, the fact that I do look at a calendar almost daily.  But somehow I just did not recognize that the big day of love is just over a week away.  Not that it matters much to me or my hubby.  Our first Valentine's Day as a married couple was an all out splurge.  We rented a hotel room (literally across the street from our tiny apartment), bought each other pricey and elaborate gifts, and splurged on a 3-course meal at the nicest restaurant in our hometown.  It took only one holiday like this to recognize that we were now sharing our money, and didn't quite have the cash in our meager student budget to do such crazy things.  After that, I can only remember bits and pieces of Valentine Day celebrations...like burgers from Burger King after a crazy day at work, or falling asleep on the couch while watching episodes of Seinfeld...you know, really romantic things like that.  So I'm not too concerned with the fact that Valentine's Day is creeping up on me, except for the fact that I have 3 lovely desserts that would be absolutely perfect for this cute little holiday that I need to share with you before then!  So I had better get to it!  And I will start with this wonderfully sweet concoction.  My husband put this in the top 3 desserts that I have ever made!  That is big.  It was so good and creamy and perfect in fact, that I actually made it twice in the same week!  We all loved it and I think it would be the perfect ending to any Valentine's Day dinner!  

Strawberry Cream Pie

1 cup (6 ounce) semisweet chocolate chips, divided
3 teaspoon shortening, divided
2 cups graham cracker crumbs
1/2 cup butter, melted
1 package (8 ounce) cream cheese, softened (I used 1/3 fat cream cheese both times)
1/2 cup sugar
1/2 cup sour cream
1 teaspoon vanilla extract
1 carton (8 ounce) frozen whipped topping, thawed
2 cups fresh strawberries, halved
1/2 cup seedless strawberry jam

Preheat oven to 300 degrees.  Spray a 9 or 10 inch Springform pan with cooking spray.  Combine graham cracker crumbs and melted butter in a medium bowl and press into the springform pan.  Bake for 15 minutes.  Remove from oven and allow to cool completely.  I put mine in the freezer for about 5 minutes.  In a microwave, melt 3/4 cup chocolate chips and 2 teaspoons of shortening.  Stir until smooth.  Brush or spread over prepared crust.  Refrigerate until firm.

In a small bowl, beat the cream cheese, sugar, sour cream and vanilla until smooth.  Fold in the whipped topping.  Spoon into crust.  Refrigerate for 1 hour.  

Arrange strawberries over pie.  In a microwave, heat jam until melted.  Brush over the top of the strawberries and pie.  Melt remaining chocolate chips and shortening.  Stir until smooth.  Drizzle over pie (I melted mine in a plastic bag and then cut the corner off to make drizzling a cinch).  Refrigerate until chilled.  

Recipe Source:  Adapted from Taste of Home and Our Best Bites

I'm linking up at these great parties!

This recipe was featured!

nap-time creations

Sunday, February 3, 2013

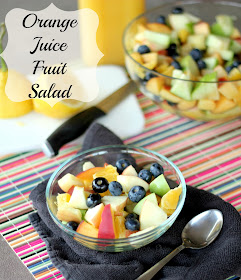
Orange Juice Fruit Salad

How did ya'll enjoy the Superbowl?!  Was it just me or did that game last F-O-R-E-V-E-R?!  If you say it was just me, I will believe you because its true that I am not the biggest fan of the old football games. That might be a tad bit of an understatement actually.  My husband, however LOVES football!  So even though I don't adore the Super Bowl , I do adore good food, and there was plenty of that to be had over here at our house.  It was a smorgasbord of unhealthy, yet deliciously satisfying treats, both savory and sweet!  Though I loved every bit of it today, there might be a bit of regret tomorrow!  In which case, I should whip of a big bowl of this beautiful, healthy, and tasty fruit salad.  And you should too...you know, if you are feeling a little guilty over your football-party binging as well.  And if you aren't feeling guilty (either because you have much much more self control than I do when faced with the likes of pizza, caramel popcorn, and cake, or because you just don't care), you should still make a bowl of this beautiful and tasty fruit salad...because its good, really good.  I have served this both as a breakfast dish and as a side dish at dinner, and it works well either way.  You can't go wrong with a good bowl of fruit salad, and this is just kicked up a notch with the addition of a sweet orange juice reduction...I love it and I think you just might too!

Orange Juice Fruit Salad
*So the fruit in this is very adaptable.  I have used pears in place of the green apple, nectarines in place of the peaches, strawberries in place of the blueberries, bananas in place of the oranges...you get the idea.  Use whatever you feel like or whatever you might have on hand.  Just make sure they will go together...obviously watermelon doesn't pair well with bananas...in my humble opinion.  But to each his own!!:)

2 medium red apples, cubed
1 medium green apple, cubed
2 medium peaches, cubed
2 Tablespoons lemon juice
1 cup orange juice
1/3 cup sugar
2 medium navel oranges, peeled, sectioned and chopped
2 cups of fresh blueberries

Place the cubed apples, peaches and lemon juice in a large bowl.  Cover with water and set aside.  In a small saucepan, combine the orange juice and sugar.  Bring to a boil and cook until the liquid is reduced to about 1/2 cup.  Drain apple mixture.  Add to the apples and peaches, the oranges, blueberries, and orange juice mixture.  Toss salad to coat with orange juice reduction.  Serve at room temperature or cold.

Recipe Source:  Taste of Home

I am linking this and other tasty recipes up to these wonderful blogs!