Showing posts with label Dessert. Show all posts

Wednesday, May 8, 2013

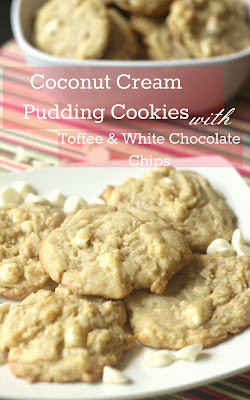
Coconut Cream Pudding Cookies with Toffee & White Chocolate Chips

I must admit, I arrived a little late to the game, when it comes to pudding cookies.  I have seen recipes involving pudding circulating the blogosphere and Pinterest for awhile now, but had yet to try them until this past February.  That is when I spotted the strawberry creme pudding at the grocery store and knew that I just had to make a cookie out of it!  And they were crazy delicious and, despite the horrific pictures I took, have become one of the most popular recipes on my blog!  After the success of those cookies, I knew it was only a matter of time until I tried more delicious combinations.  

I am also new to the incredible world of coconut cream.  Growing up, my only exposure to coconut was an Almond Joy candy bar...and I am not a fan at all!  So I have always kind of avoided the stuff.  However, a couple of months ago, my friend Tatum brought a coconut cream pie to a church activity and I took a small piece, just to give it a taste.  Well one taste was all it took and I was hooked!  I chose the coconut cream pie over the Oreo and Reese's pies!  There isn't much I would take over either peanut butter or cookies and cream, so that is big for me.  I fell in love with the flavor of coconut cream!  So when I saw coconut cream pudding the other day, I could not wait to create a delicious cookie with it!  I couldn't be happier with how these turned out!  Now I must admit, they don't taste like that incredible coconut cream pie I tasted months ago.  However, the pudding gives them an incredible flavor and makes them moist and delicious!  Two of my most favorite things in the world are toffee and white chocolate, so there was no doubt they were going into these things!  Oh these are good!  I want a batch right this minute!  Too bad its almost 11 o'clock at night...I guess I will settle for a bowl of cheesecake ice-cream...that's better right?!


Coconut Cream Pudding Cookies with Toffee & White Chocolate Chips

1 cup butter, softened
3/4 cup brown sugar
1/4 cup sugar
2 eggs
3.4 ounce package coconut cream pudding
1 teaspoon vanilla extract
2-1/2 cups all purpose flour
1 teaspoon baking soda
1/2 teaspoon salt
1-1/2 cups white chocolate chips
1/2-3/4 cup toffee chips 

Preheat oven to 350 degrees.  Prepare baking sheets by spraying with non-stick cooking spray or lining with parchment or baking mat.  In a medium bowl, combine the butter and sugars.  Mix until fluffy and add eggs one at a time, mixing between each addition.  Add vanilla and pudding and mix well.  

In a separate bowl, whisk together flour, baking soda, and salt.  Add it to the pudding mixture and mix until well combined.  Stir in the white chocolate and toffee chips.  Drop by rounded tablespoon onto the prepared pans and bake for 10 to 12 minutes, being careful not to over bake.  

Recipe Source:  The Unsophisticated Kitchen

You can find this recipe linked up at these great parties!

Tuesday, April 2, 2013

Chocolate Lover's Dream Cookies


It has been nearly another week since my last post!  Am I the only one that ever feels like life is impossible to catch up on?!  I know I'm not, but for some reason right now that is where I am at.  I can't seem to get my head on straight lately!  And time is just flying by!  I don't know if I have mentioned this before, but my husband is graduating from dental school next month and we are moving our little family clear across the country to Chattanooga, Tennessee!  We are super excited about this new adventure we are about to embark on, but also really overwhelmed at what it takes to make a move of this magnitude!  We are also really sad to be leaving this city in Arizona that we have made our home.  Needless to say the next 8 weeks of life are going to be full of stress, anxiety and lots of other emotions.  To get me through this phase, I am going to need lots of sugary, rich desserts...just like these chocolate lover's dream cookies.  These are delicious little morsels of chocolatey goodness!  As the name implies, they are chalk full of chocolate...a base that delightfully tastes like a chewy brownie,  dotted with chunks of my personal favorite, white chocolate chips and then of course, semi-sweet (or in my case, milk chocolate) chips as well!  Perfect!  It took me about 10 cookies, before I realized that these were infinitely better when dipped in a cold glass of milk!  They were super easy to throw together and are literally a chocolate lover's dream cookie! 

Chocolate Lover's Dream Cookies

6 Tablespoons canola oil
1/4 cup butter, softened
3/4 cup packed brown sugar
1/2 cup sugar
2 eggs
1 teaspoon vanilla extract
1-1/4 cups all purpose flour
1/2 cup baking cocoa
1/4 teaspoon baking powder
1 cup vanilla or white chocolate chips
1 cup semisweet chocolate chips (I used 1/2 milk chocolate and 1/2 semisweet & loved the result)

Preheat oven to 350 degrees.

In a large bowl, beat the oil, butter and sugars until well blended.  Add eggs, one at a time, beating well after each addition.  Beat in vanilla.  Combine the flour, cocoa and baking powder in a medium bowl; gradually add to oil mixture and mix well.   Stir in both kinds of chocolate chips.

Drop by rounded tablespoonfuls 2 inches apart onto greased baking sheets or baking mat.  Bake for 12-15 minutes or until edges begin to brown.  Do not over bake!  Cool for 1 minute before removing from pans to wire racks to finish cooling.

Recipe Source:  Taste of Home

I am linking up at these great parties!

PS...How was your Easter?!  Ours was fantastic!  We attended church, had friends over for dinner and dessert, and just spent time together as a family.  It was a really nice weekend for us!  Though this has nothing to do with food, other than the fact that Easter is a day to eat an amazingly delicious meal, I had to share this picture of my sweet kids in their Easter best!  My 2 year old is a bit of a stinker and REFUSED to let me take a good picture of her, so this one featuring her non-smiling glare, is literally the best one I got!  I hope your Easter was as good as ours!

Sunday, March 17, 2013

Chocolate & Peanut Butter Mousse Cheesecake

Are you looking for a crazy, decadent, over-the-top in deliciousness, dessert?  Well then look no further.  Seriously.  I have you covered right here.  This cheesecake is heaven.  I am a lover of all things  peanut butter and chocolate (who isn't though, right?!), so this was right up my alley.  You know, when my husband and I were dating, he claimed to be a hater of cheesecake.  I thought he was completely nuts and it was almost a deal breaker for me.  I mean, how could I be with someone who wouldn't share a slice of cheesecake with me?!  Thankfully, I have since converted him (yeah, I'm taking credit for it) and he now loves it...as long as it is high quality and totally rich.  And let me tell you, he loved this!  He even had a piece for his after-church snack today and he does NOT do left overs of any kind!  My favorite part was the peanut butter mousse.  It balanced perfectly with the rich chocolate and ganache layers to create a little bit of heaven in every bite.  Make this as soon as you can, but make sure you have someone to share it with...and maybe a tall glass of milk.  This is insanely delicious!  You will love it!

Chocolate & Peanut Butter Mousse Cheesecake

1-1/2 cups chocolate sandwich cookie crumbs (like Oreos)
1/4 cup butter, melted

Mousse Layers
3/4 cup creamy peanut butter
5 ounces cream cheese softened
2 Tablespoons butter, softened
1-1/4 cups confectioners' sugar
1-1/4 cups heavy cream, whipped, divided
5 ounces bittersweet chocolate, chopped
1 milk chocolate candy bar (3.5 ounce), chopped
1/3 cup sugar
1/4 cup milk
1 teaspoon vanilla extract

Ganache
6 ounces bittersweet chocolate, chopped
2/3 heavy cream
1 teaspoon vanilla extract

In a bowl, combine cookie crumbs and butter.  Press onto the bottom of a greased 9-inch springform pan.  In a bowl, beat the peanut butter, cream cheese and butter until smooth.  Add confectioners' sugar and beat until smooth.  With a spatula, fold in 1-1/4 cups of the whipped cream.  Spread over crust.

Place bittersweet and milk chocolate in a bowl.  In a small saucepan, bring sugar and milk just to a boil.  Pour over chocolate and whisk until smooth.  Stir in vanilla.  Cool to room temperature.  Gently fold in remaining whipped cream.  Spread over peanut butter layer.  Cover and freeze for 2 hours or until firm.  

For ganache, place chocolate in a bowl.  In a small saucepan, bring heavy cream just to a boil.  Pour over chocolate and whisk until smooth.  Stir in vanilla.  Cool to reach spreading consistency, stirring occasionally.  Spread over cheesecake.  Refrigerate until set.  With a knife, loosen cheesecake from the springform pan and remove rim.  Serve.  Refrigerate leftovers.

Recipe Source:  Adapted from Taste of Home

 I am sharing this recipe at these great link parties!

Tuesday, March 5, 2013

Peanut Butter-Banana Whoopie Pies

My family has been hit majorly hard with a bug this past week!  I was sick the entire time we were in Disneyland!  We have been home for days and I still can't kick this thing!  I was even stuck in bed on my birthday for the whole day!  I didn't even have the strength to make myself a cake!  It was a sad sad way to enter the last year of my 20's!  I guess I will just have to find another excuse to make a decadent and yummy dessert!  Anyways, this sickness has caused me to be useless in about every facet of life right now...except laying on the couch and ingesting rather large amounts of popsicles...I've got that down okay.  I have not cooked a real meal for my family in what seems like an eternity!  I'm hoping to get back to that tomorrow.  So for tonight I will leave you with these delightful little whoopie pies that I baked up several weeks ago.  I think peanut butter and banana are a match made in heaven and these combine both flavors perfectly.  This was my first experience with whoopie pies and I thought they were a pretty fun little treat to throw together, and I'm excited to try out many more combinations!  Enjoy!

Peanut Butter-Banana Whoopie Pies

1/2 cup butter, softened
3/4 cup sugar
1/4 cup packed brown sugar
1 egg
1 teaspoon vanilla extract
1/2 cup mashed ripe banana
1/2 cup buttermilk
2 cups all-purpose flour
1/2 teaspoon salt
1/2 teaspoon baking powder
1/2 teaspoon baking soda

Filling:
1 package (8 ounce) cream cheese, softened
1 cup creamy peanut butter
3 Tablespoon butter, softened
1 cup confectioners' sugar
1 teaspoon vanilla extract
Additional confectioners' sugar

Preheat oven to 350 degrees.  Line a baking sheet with parchment paper and set aside.  In a large bowl, cream butter and sugars until light and fluffy.  Beat in egg and vanilla.  In a small bowl, combine banana and buttermilk.  Combine the flour, salt, baking powder and baking soda.  Gradually add to creamed mixture alternately with banana mixture.  Drop by tablespoonfuls 2 inches apart onto parchment paper-lined baking sheets.  Bake for 12 to 15 minutes or until set.  Cool for 2 minutes before removing from pans to wire racks to cool completely.  For filling, in a large bowl, beat cream cheese, peanut butter and butter until fluffy.  Beat in confectioners' sugar and vanilla until smooth.  Spread filling on the bottoms of half of the cookies, about 1 Tablespoon on each.  Top with remaining cookies.    Dust with additional confectioners' sugar.  Store in the refrigerator.  I would suggest removing pies from the fridge about 10 minutes before consuming. They are much more delicious when closer to room temperature than cold.

Recipe Source:  Taste of Home

I am linking up at these great parties!

Thursday, February 21, 2013

Caramel Apple Pizza

Let's talk favorites here for a minute.  Have you ever been to a favorite things party?  Tonight I attended my second one ever.  They are great.  Let me tell you about them just in case you haven't been.  Each party-goer picks something that is their favorite, then purchases 5 of that item.  Our limit tonight was $5, but it could be set either higher or lower.  Then each person puts their name into a box 5 times.  The box is passed around the room to each person and when it arrives in your lap, you explain a little about your favorite item, draw out 5 names and hand over your favorite thing to each of those 5 people.  So each person leaves the party with 5 different things!  So fun!  I left with some real treasures tonight!  If you haven't been to one of these parties, you should totally throw one yourself.  They are a blast!  So I took some fun Ikea kitchen tools as my favorite items tonight.  But another favorite that I have is pizza.  Even after working at 2 different pizza restaurants for a combined total of nearly a decade, I could still eat it just about everyday!  I have another favorite...sugary sweets.  I am truly a sucker for anything packed with sugar.  This caramel apple pizza, though not your traditional pizza, fits the bill for both of my favorites.  Its a little twist on a classic favorite.  I made this for the favorite things party tonight.  You should make it for yours...that I know you are going to throw...because by now I have convinced you of how fun they are and you are dying to do it...right?!

Caramel Apple Pizza

*If you are like me and do not keep pastry flour around the house, fear not, you can easily substitute all purpose flour.  Just place 2 tablespoons of cornstarch into a 1-cup measuring cup.  Fill the rest with all purpose flour.  Sift the mixture into a bowl or onto a plate and then take your 1 cup of flour from that. That simply replaces the 1-cup whole wheat pastry flour, so make sure you still add the 3/4 cup all purpose flour as well, giving you a grand total of 1-3/4 cup flour.  Also, as I was taking this to a party I wanted to make sure my apples didn't turn brown.  There are a variety of ways to stop that from happening, but I just soaked mine in some lemon water and that worked perfectly.

Crust
3/4 cup butter, softened
1/4 cup sugar
1/4 cup packed brown sugar
1 egg
2 Tablespoons canola oil
1 Tablespoon light corn syrup
1 teaspoon vanilla extract
1 cup whole wheat pastry flour
3/4 cup all-purpose flour
1/2 teaspoon baking powder
1/4 teaspoon salt
1/4 teaspoon ground cinnamon

Topping
1 package (8 ounce) cream cheese
1/4 cup packed brown sugar
1/2 teaspoon ground cinnamon
1/2 teaspoon vanilla extract
3 medium granny smith apples, thinly sliced
1/4 cup caramel ice cream topping
1/4 cup chopped unsalted dry roasted peanuts

Preheat the oven to 350 degrees and grease a 140-inch pizza pan.  In a large bowl, cream butter and sugars until light and fluffy.  Beat in the egg, oil, corn syrup and vanilla.  In a medium size bowl, combine the flours, baking powder, salt and cinnamon.  Gradually add to creamed mixture and mix well.  Press dough onto a the pizza pan.  Bake for 12-15 minutes or until lightly browned.  Cool on a wire rack.  In a small bowl, beat the cream cheese, brown sugar, cinnamon and vanilla until smooth.  Spread over crust.  Arrange apples over the top.  Drizzle with caramel topping and sprinkle with peanuts.  Serve immediately.

Recipe Source:  Taste of Home Appetizers

I'm linking up at these parties!  Go check them out!

Sunday, February 10, 2013

White Chocolate Raspberry Torte

Well, here is the final dessert in my Valentine's Day Dessert series.  This one was maybe my favorite of the three.  I have mentioned before that I ADORE white chocolate.  So obviously I was sold on this dessert before I even made it.  I had planned on making this for my upcoming birthday dessert (yes, I make my own birthday dessert...not because my husband wouldn't do it for because he totally would, but because I really love doing it!), but then we were invited to a couple's game night last weekend and were instructed to bring a Valentine treat.  This just screamed Valentine's Day to me, so it was bumped on the to-be-made schedule.  Now one thing I must mention about this little dessert.  The cake is good.  The melted white chocolate and buttermilk make it a very dense and heavy cake, which is delicious, but as a stand alone, I wouldn't be jumping up and down about it.  The real show stopper here is the frosting!  Oh my goodness!  I could (and did) just eat it by the spoonful!!  It is what makes this cake what it is...insanely delicious!  Think cream cheese, whipped cream and more white chocolate!!  Oh it is heaven!  The whole thing comes together much easier than it looks and would be the perfect follow up to your Valentine's Day meal (or any meal for that matter!)!

White Chocolate Raspberry Torte 

*When you make up the frosting, it is going to seem like there is a ton of it!  I thought that and so I did not use all of the frosting.  Big mistake!!  Because of how dense and heavy the cake is, it can handle (and quite frankly needs) the extra frosting.  I promise it will not be too much...so use it up!  Like I said, it is the best part and you will be so glad you have it on there!  Also, I do not ever have cake flour on hand.  Instead I filled a measuring cup with 2 tablespoons of cornstarch and the rest with flour.  I did this 3 times and then sifted the flour onto parchment paper.  Then I measure the 3 cups of flour that I needed flour from that mixture...it worked perfectly!

Cake:
3/4 cup butter
2 cups sugar
4 eggs
1 cup white baking chips, melted and cooled
1 teaspoon vanilla extract
3 cups cake flour (Or mixture of all purpose flour & cornstarch...see above note)
1 teaspoon baking powder
1/2 teaspoon baking soda
1 cup buttermilk

Filling:
2 cups fresh or frozen raspberries (I used frozen and it worked wonderfully)
3/4 cup water
1/2 cup sugar
3 Tablespoons cornstarch

Frosting:
1 package (8 ounce) cream cheese (I used 1/3 less fat with fantastic results)
1 cup vanilla or white chocolate chips, melted and cooled
12 ounces frozen whipped topping, thawed
Fresh Raspberries for garnishing, optional

Preheat oven to 350 degrees.  Grease and flour 2 9-inch round baking pans and set aside.  Cream butter and sugar until fluffy.  Add eggs, one at a time, beating well after each addition.  Beat in melted chips and vanilla.  Combine flour, baking powder and soda and add to creamed mixture alternately with buttermilk, beating well after each addition.

Pour the batter evenly into prepared baking pans.  Bake for 28-32 minutes or until a toothpick comes out clean.  Cool 10 minutes before removing from pans to wire racks to cool completely.

In a small saucepan, bring raspberries and water to a boil.  Reduce heat and simmer for 5 minutes.  Strain raspberry mixture into a bowl and discard the seeds.  Cool.  In the same pan, combine sugar and cornstarch.  Stir in raspberry puree until smooth.  Bring to a boil.  Cook and stir for 2 minutes or until thickened.  Cool. Spread between cake layers.

In a large bowl, beat cream cheese until fluffy.  Beat in melted chips and fold in whipped topping.  Spread over the top and sides of cake.  Reserve some frosting to pipe over the top edge of cake with a pastry bag (obviously that is optional, you can just spread all of the frosting over the cake top and sides if desired).  Garnish with berries if desired.  Store in refrigerator, but I definitely recommend allowing it to warm up a bit before serving.

Recipe Source:  Taste of Home
I am linking up at these fantastic blogs!

Thursday, February 7, 2013

Strawberry Creme Pudding Cookies

As mentioned in my last post for the Strawberry Cream Pie, I am sharing 2 more amazing and perfect for Valentine's Day desserts this week.  Before I get started on the recipe for these sweet little cookies, I must first publicly acknowledge the atrocity of these pictures.  I was off my game that day...big time.  I tried about a million different set-ups (poses doesn't seem like the right word when you are talking about cookies), but I just couldn't get the lighting (or anything) right with these!  It was putting my frustration level at an incredible high.  Now, I understand there is a an easy fix to that...make the cookies again and start over with the photo shoot.  Here's the deal...I can't make these again...because I don't think my hips and thighs can take another inhalation of a second batch.  That is right...I ate almost the whole entire batch of these cookies!  They were so amazingly delicious that I could not stop eating them!  I had made 2 small bags to give to some friends, but only one made it out the door that first day.  The second bag sat on my counter for another day and since my stash was gone and I was still feeling the intense need to eat these, I opened that up and ate those too!  Seriously.  I have problems.  So you see, I cannot make these again, because I will eat them...all of them.  Pudding cookies are my new favorite thing.  I had never used a box of pudding in cookies before, but after trying some several weeks ago, I have been thinking of lots of new combinations, and when I saw Strawberry Creme pudding at the grocery store, I knew I wanted to create a cookie utilizing it.  My most favorite type of chocolate is white, so it was a no brainer that I would throw some of that in there.  I thought these were just delightful!  I think you should make these, and I believe that  if you do make them, you just might excuse me for my sub-par pictures.
Strawberry Creme Pudding Cookies
*I added a few drops of red food coloring to my cookie dough.  I was hoping that the pudding itself would give the cookies an intense pink color...it didn't.  The food coloring didn't give it that either, but it did help them to be a little more on the pink side...still not what I was going for, but the taste was, so I figured that was okay.  So play with the color as much or as little as you would like.

1 cup butter, softened
1/2 cup brown sugar
1/2 sugar
2 eggs
3.4 ounce package instant Strawberry Creme pudding
1 teaspoon vanilla extract
2 1/4 cups all purpose flour
1 teaspoon baking soda
1/2 teaspoon salt
1-1/2 cups white chocolate chips

 Preheat oven to 350 degrees.  Prepare a baking sheet by lining with parchment paper, baking mat or by spraying it with cooking spray.  In a medium size bowl, or in the bowl of a stand-mixer, combine butter and sugars.  Mix until creamy.  Add in the eggs, vanilla and pudding and mix until well combined.  If you want to add food coloring, add it at this point and mix.  In a separate bowl, combine the flour, baking soda and salt. Whisk together and then add it to the pudding mixture.  Mix until the ingredients are combined.  Fold in the white chocolate chips.  Drop the dough by rounded tablespoon onto the prepared pan.  Bake for 10-12 minutes or until set.  Let cookies cool on the pan for several minutes before transferring them to a wire rack to cool completely.

Recipe Source:  Adapted from Two Peas and Their Pod 

Tuesday, February 5, 2013

Strawberry Cream Pie


Valentines Day is next week.  Did you know that?  I'm sure you did;  I'm sure everyone does.  I should have known that, but somehow it escaped my attention.  I don't know how that is possible, since everywhere I look its red velvet this, and heart shaped that (which I love!).  Not to mention, the fact that I do look at a calendar almost daily.  But somehow I just did not recognize that the big day of love is just over a week away.  Not that it matters much to me or my hubby.  Our first Valentine's Day as a married couple was an all out splurge.  We rented a hotel room (literally across the street from our tiny apartment), bought each other pricey and elaborate gifts, and splurged on a 3-course meal at the nicest restaurant in our hometown.  It took only one holiday like this to recognize that we were now sharing our money, and didn't quite have the cash in our meager student budget to do such crazy things.  After that, I can only remember bits and pieces of Valentine Day celebrations...like burgers from Burger King after a crazy day at work, or falling asleep on the couch while watching episodes of Seinfeld...you know, really romantic things like that.  So I'm not too concerned with the fact that Valentine's Day is creeping up on me, except for the fact that I have 3 lovely desserts that would be absolutely perfect for this cute little holiday that I need to share with you before then!  So I had better get to it!  And I will start with this wonderfully sweet concoction.  My husband put this in the top 3 desserts that I have ever made!  That is big.  It was so good and creamy and perfect in fact, that I actually made it twice in the same week!  We all loved it and I think it would be the perfect ending to any Valentine's Day dinner!  

Strawberry Cream Pie

1 cup (6 ounce) semisweet chocolate chips, divided
3 teaspoon shortening, divided
2 cups graham cracker crumbs
1/2 cup butter, melted
1 package (8 ounce) cream cheese, softened (I used 1/3 fat cream cheese both times)
1/2 cup sugar
1/2 cup sour cream
1 teaspoon vanilla extract
1 carton (8 ounce) frozen whipped topping, thawed
2 cups fresh strawberries, halved
1/2 cup seedless strawberry jam

Preheat oven to 300 degrees.  Spray a 9 or 10 inch Springform pan with cooking spray.  Combine graham cracker crumbs and melted butter in a medium bowl and press into the springform pan.  Bake for 15 minutes.  Remove from oven and allow to cool completely.  I put mine in the freezer for about 5 minutes.  In a microwave, melt 3/4 cup chocolate chips and 2 teaspoons of shortening.  Stir until smooth.  Brush or spread over prepared crust.  Refrigerate until firm.

In a small bowl, beat the cream cheese, sugar, sour cream and vanilla until smooth.  Fold in the whipped topping.  Spoon into crust.  Refrigerate for 1 hour.  

Arrange strawberries over pie.  In a microwave, heat jam until melted.  Brush over the top of the strawberries and pie.  Melt remaining chocolate chips and shortening.  Stir until smooth.  Drizzle over pie (I melted mine in a plastic bag and then cut the corner off to make drizzling a cinch).  Refrigerate until chilled.  

Recipe Source:  Adapted from Taste of Home and Our Best Bites

I'm linking up at these great parties!

This recipe was featured!

nap-time creations

Tuesday, January 29, 2013

Peanut Butter Cup Cookies

 I baked these sweet things up a couple of weeks ago, and I'm not quite sure what has taken me so long to post them.  They are good...really good.  These are the second of the two decadent peanut butter desserts that I mentioned in this post a couple of weeks ago.  I don't know about you, but I love me a good peanut butter cookie.  Now stuff one of those peanut butter cookies with a mini Reese's peanut butter cup, drizzle it with some milk chocolate, and that good peanut butter cookie has now become down right irresistible.   Like I said, these are really good.  Make them!  Please!
Peanut Butter Cup Cookies
*Just a couple notes about this recipe.  The dough needs to chill in the refrigerator for about an hour before baking, so make sure to plan ahead.  Also, it says to bake on an ungreased cookie sheet, but I always grease because I am terrified of stickage (yes I just made that word up), and they turned out beautifully.  Also, the original recipe said that reduced-fat or generic brands of peanut butter are not recommended for this recipe.  I don't know why...just thought I should pass that along to you, lest you make these and they turn out bad and I am blamed...haha!

Makes about 3 dozen

1 cup butter, softened
1/2 cup creamy peanut butter
3/4 cup packed brown sugar
1/2 cup sugar
1 egg
1 teaspoon vanilla extract
2 cups all purpose flour
1 teaspoon baking soda
1 package (13 ounce) miniature peanut butter cups

Drizzle:
1 cup (6 ounce) chocolate chips (the original recipe called for semisweet, but I used milk because that's   the best chocolate there is...in my ever so humble opinion.)
1 Tablespoon creamy peanut butter
1 teaspoon shortening

In a large bowl, cream the butter, peanut butter and sugars until light and fluffy.  Beat in egg and vanilla.  Combine the flour and baking soda; gradually add to creamed mixture and mix well.  Cover and refrigerate for 1 hour or until easy to handle.

Roll into 1-1/4 inch balls.  Press a miniature peanut butter cup into each; reshape balls to make sure the chocolate is completely covered.  Place 2 inches apart on ungreased baking sheets.  Bake at 350 degrees for 12-15 minutes or until lightly browned.  Cool for 2 minutes before removing from pans to wire racks.  

For drizzle:
In a microwave-safe bowl, melt the chocolate chips, peanut butter and shortening; stir until smooth.  Drizzle over cooled cookies. 

Recipe Source: Taste of Home 

I am linking up at these wonderful blogs.

Thursday, January 17, 2013

Peanut Butter M&M Cupcakes

I have two delicious, decadent, and incredible peanut butter treats that I could share with you tonight, and it was a tough choice which one to go with!  They are both crazy good and totally unhealthy!  Just keepin' it real here.  But, come on people.  I said peanut butter M&M cupcakes...as in a peanut butter cupcake stuffed with whole peanut butter M&Ms that soften on the inside during the baking process, but somehow are still able to keep their crunchy candy coating shell, that are then topped with an insanely creamy and rich chocolate frosting.  How can that be healthy?!  It cannot.  So step off the healthy track for a minute (if you are on it; if not, even better), eat an M&M cupcake, and realize it was totally worth it!  I strongly encourage you to eat these babies with a tall glass of milk.  Enjoy!

Peanut Butter M&M Cupcakes

Cupcakes:

1 (18.25 ounce) Yellow or white cupcake mix
1 cup sour cream (light is fine, don't use fat free)
3 eggs
1/4 cup canola oil
3/4 cup creamy peanut butter
1 teaspoon vanilla
1-2 cups peanut butter M&Ms

Frosting:

1/4 cup melted butter (no substitutions)
1/4 cup plus 2 tablespoons unsweetened cocoa powder
1 pound powdered sugar
1/4 cup plus 2 tablespoons evaporated or regular milk
1 teaspoon vanilla extract

Preheat oven to 350 degrees.  Line two 12-cup muffin tins with cupcake liners and set aside.  Combine all cupcake ingredients, except M&Ms into a large bowl.  Using an electric mixer on medium low speed, mix for 30 seconds, scraping the bowl frequently.  Turn the speed to high and beat for another 3 minutes.  Gently fold in the peanut butter M&Ms.  Fill each muffin cup about 3/4 full.  Bake 18-22 minutes or until tops are golden.  Remove from the oven and allow to cool completely.  While the cupcakes are cooling, prepare the chocolate frosting by combining all ingredients in a medium bowl and beating them together on medium speed until the frosting is light and fluffy.  Top each cupcake with frosting and, if desired, an extra M&M.

Recipe Source:  Adapted from Our Best Bites.

I joined the Linky Party at:
Bloom Designs
Somewhat Simple
Sweet Bella Roos
Tidy Mom
The Country Cook
Whipperberry
Foodie Friends Friday
Tator Tots & Jello
Six Sister's Stuff
I Heart Nap Time
Chef in Training
Jam Hands
Related Posts Plugin for WordPress, Blogger...