Tuesday, May 21, 2013

BBQ Chicken Pizza

Nearly 12 years ago, my mom forced me to go into a little pizza restaurant in our hometown and fill out a job application.  Papa Murphy's...maybe you have heard of it...?  I begrudgingly did so, swearing that I would only work there for a few weeks, just until I found my dream job at somewhere more glamorous like...the mall.  Well guess what?!  That little job that I was keeping only to pacify my mom's desire for me to not be a lazy bum all summer...became a huge part of my life.  One in which, I officially finished today!!!  That is right...just short of 12 years!  I can't believe I even just said that!  I started working there the summer before my senior year and found, after only a few short months, that I not only loved the people I worked with, but that the owners of the company were marvelous!  I was an assistant manager and then a store manager for several years during college, and left the position just after my first baby turned one.  Then they offered me an incredible opportunity to work for them from my home, out of state, watching their security cameras weekly.  So that is what I have been doing for them the past 4 years, and it has been an incredible blessing to make a small income while my husband went to dental school. But since he is graduating next week and finally getting started on his career, I thought it was finally time to cut ties and focus on other things!  But I will always be thankful for that job!  

Since this seems like the ending of an era to me, I thought I'd go out by posting a re-creation of one of my favorite pizzas from Papa Murphy's...the BBQ Chicken.  You would think after so many years of working in one place, I would abhor the food.  But it is actually quite the opposite.  Papa Murphy's is still one of my favorite places to get pizza and I especially love their specialty pizzas.  They don't always carry the BBQ chicken, and in fact, not all stores even get it.  This past weekend, I had a sudden craving for it and decided to create my own version.  It was really yummy!  If you like BBQ sauce, then I think you will love this!
BBQ Chicken Pizza

*You can use whatever pizza dough recipe that you would like.  I like this one because it is easy and requires no rising.  I use it all the time when I need a quick dinner idea and it tastes great.  If making dough isn't your thing, purchase a ready made crust from the store and use it instead.

Fast and Easy Pizza Dough

3 cups flour, more or less
1 Tablespoon honey, heaping
1 Tablespoon oil, heaping
1 cup warm water
1 Tablespoon yeast
1/2 teaspoon garlic salt

Topping

1-1/2 cups shredded or chopped cooked chicken
2 cups shredded mozzarella, divided
1/2 cup 3 Tablespoons your favorite BBQ sauce, divided
2 green onions, chopped
1 roma tomato, chopped


Preheat oven to 475 degrees.  If you are using a pizza stone, let the stone heat for at least 30 minutes in the oven before baking.

Mix all pizza dough ingredients together, except the flour.  Add the flour and knead for several minutes, then put into pan, pizza peel or pizza stone.

Combine the chicken and 1/4 cup BBQ sauce and mix until the chicken is covered.  Spread the remaining 1/4 cup + 3 Tablespoons BBQ sauce over the pizza dough.  Sprinkle about 1-1/2 cups mozzarella cheese over the sauce.  Sprinkle the chicken mixture over the mozzarella cheese.  Sprinkle the green onions and tomato on top.  Then cover with the rest of the mozzarella.

If baking in a sheet pan, bake for 12 minutes (checking often) until crust is browned and cheese is golden and bubbly.  If baking on the preheated pizza stone, slide pizza onto the stone and bake for about 8 minutes.  Makes 1 large pizza.

Recipe Source:  The Unsophisticated Kitchen using the pizza dough recipe from Mel's Kitchen Cafe.

I like to link up at these great parties!

Sunday, May 19, 2013

Balsamic Glazed Pork Loin

I present to you my very favorite dinner!  Seriously, there are a great many meals that I love, but this my friends, is the best.  I even chose this for my Mother's Day meal!  My husband, Jason, is a beef kind of guy.  He will pick beef any day, over the best ever pork meal.  But even he loved this!  Every last piece of roast was devoured.  And to add to its appeal, the pork is cooked in the slow cooker!  Easy and delicious!  I encourage you to make this..and soon!  

Balsamic Glazed Pork Loin

Pork:
2 pound boneless pork loin roast, trimmed of large fat pockets
1 teaspoon ground sage
1/2 teaspoon salt
1/2 teaspoon pepper
1 clove of garlic, finely minced
1/2 cup water

Glaze:
1/2 cup brown sugar, light or dark
1 Tablespoon cornstarch
1/4 cup balsamic vinegar
1/2 cup water
2 Tablespoons soy sauce

In a small bowl, combine the sage, salt, pepper and minced garlic.  Rub the spices all over the roast and place it in the slow cooker.  Pour 1/2 cup water into the slow cooker.  Cover and cook on low for 6-8 hours.  Near the end of the cooking time for the roast, combine the ingredients for the glaze in a small saucepan and bring the mixture to a boil.  Reduce the heat and let the mixture simmer, stirring occasionally, until it thickens.  Remove the pork from the slow cooker and shred.  Place on a platter or plate and drizzle the glaze over the pork.  Serve.

Recipe Source:  Mel's Kitchen Cafe

This recipe is linked up at these great parties!

Wednesday, May 8, 2013

Coconut Cream Pudding Cookies with Toffee & White Chocolate Chips

I must admit, I arrived a little late to the game, when it comes to pudding cookies.  I have seen recipes involving pudding circulating the blogosphere and Pinterest for awhile now, but had yet to try them until this past February.  That is when I spotted the strawberry creme pudding at the grocery store and knew that I just had to make a cookie out of it!  And they were crazy delicious and, despite the horrific pictures I took, have become one of the most popular recipes on my blog!  After the success of those cookies, I knew it was only a matter of time until I tried more delicious combinations.  

I am also new to the incredible world of coconut cream.  Growing up, my only exposure to coconut was an Almond Joy candy bar...and I am not a fan at all!  So I have always kind of avoided the stuff.  However, a couple of months ago, my friend Tatum brought a coconut cream pie to a church activity and I took a small piece, just to give it a taste.  Well one taste was all it took and I was hooked!  I chose the coconut cream pie over the Oreo and Reese's pies!  There isn't much I would take over either peanut butter or cookies and cream, so that is big for me.  I fell in love with the flavor of coconut cream!  So when I saw coconut cream pudding the other day, I could not wait to create a delicious cookie with it!  I couldn't be happier with how these turned out!  Now I must admit, they don't taste like that incredible coconut cream pie I tasted months ago.  However, the pudding gives them an incredible flavor and makes them moist and delicious!  Two of my most favorite things in the world are toffee and white chocolate, so there was no doubt they were going into these things!  Oh these are good!  I want a batch right this minute!  Too bad its almost 11 o'clock at night...I guess I will settle for a bowl of cheesecake ice-cream...that's better right?!


Coconut Cream Pudding Cookies with Toffee & White Chocolate Chips

1 cup butter, softened
3/4 cup brown sugar
1/4 cup sugar
2 eggs
3.4 ounce package coconut cream pudding
1 teaspoon vanilla extract
2-1/2 cups all purpose flour
1 teaspoon baking soda
1/2 teaspoon salt
1-1/2 cups white chocolate chips
1/2-3/4 cup toffee chips 

Preheat oven to 350 degrees.  Prepare baking sheets by spraying with non-stick cooking spray or lining with parchment or baking mat.  In a medium bowl, combine the butter and sugars.  Mix until fluffy and add eggs one at a time, mixing between each addition.  Add vanilla and pudding and mix well.  

In a separate bowl, whisk together flour, baking soda, and salt.  Add it to the pudding mixture and mix until well combined.  Stir in the white chocolate and toffee chips.  Drop by rounded tablespoon onto the prepared pans and bake for 10 to 12 minutes, being careful not to over bake.  

Recipe Source:  The Unsophisticated Kitchen

You can find this recipe linked up at these great parties!

Wednesday, May 1, 2013

Curried Chicken Shephed's Pie

First of all, anyone have any tips on photographing a casserole?!  That was not an easy task!  No matter what I did, my dish just looked like a sloppy, gloppy mess!  Is gloppy a word?  I don't think so.  Don't let the pictures deter you from making this shepherd's pie though...it is delicious!  

What do you think of when you hear the term comfort food?  I have heard it in relation to foods like pot roast, grilled cheese sandwiches, fried chicken, those types of foods.  For me, shepherd's pie is the ultimate comfort food.  I had never had a shepherd's pie until I met my husband.  It was one of the first dishes that his mom served when I started joining their family for Sunday dinner.  Though a little nervous about the combination of green beans, potatoes and hamburger at first, I was hooked after one bite.  Now that we are living away from our families and no longer able to join either of them for Sunday dinner, I now consider things like my mother-in-law's shepherd's pie and my mom's sloppy joes and baked beans to be pure, down-right delicious comfort foods.  If there is one thing I hate about living far from family, it is missing those Sunday dinners, at either my parent's house or my in-law's.  I wish we could be there every week.  But since we can't, its my job to serve up those comfort dishes to my little family, and since I like to try new things, I decided to switch it up a little bit and try out a twist on the old (and well beloved) shepherd's pie...and this is it...Curried Chicken Shepherd's Pie.  Tender pieces of chicken breast, are enveloped in a slightly spicy, chicken broth based sauce, mixed in with tender vegetables and covered up by buttery and creamy mashed potatoes.  I thought this dinner was amazingly delicious!  

So tell me what are some of your favorite comfort foods?!

Curried Chicken Shepherd's Pie

This recipe calls for cooked chicken and prepared mashed potatoes...so plan ahead!  This would be a great recipe to use up some left over mashed potatoes.

1 large onion, chopped
2 celery ribs, chopped
2 Tablespoons butter, divided
1 cup frozen peas and carrots
3 Tablespoons all-purpose flour
1 teaspoon curry powder
1-1/2 cups reduced sodium chicken broth
1/2 cup milk
2 cups cubed cooked chicken
2 Tablespoons dried parsley flakes
1/2 teaspoon salt
1/2 teaspoon pepper
2 cups mashed potatoes
1/4 teaspoon milk

In a large skillet, sauge onion and celery in 1 Tablespoon of butter until tender.  Add frozen vegetables and remaining butter.  Cook for 2 minutes longer.

Stir in flour and curry powder until blended; gradually add broth and milk.  Bring to a boil; cook and stir for 1 minute or until thickened.  Add the chicken, parsley, salt and pepper.

Transfer to a greased 2-quart baking dish.  Top with potatoes and sprinkle paprika over the top.  Bake, uncovered, at 350 degrees, for 25-30 minutes or until heated through.

Recipe Source:  Adapted ever so slightly from Taste Of Home 

You may find this recipe linked up at these parties!

Sunday, April 21, 2013

Mini Puffed Oven Pancakes


This weekend we celebrated my husband's 30th birthday!  He has had a hard time with this idea of getting older, but I for one, think he is just getting better with age!  Let me take a minute to tell you about this husband I have.  He is pretty awesome.  He is one of the hardest workers I know, he is an amazing father and he. is. funny.  He has done so many things for our family in the nearly 9 years that we have been married, including but not limited to...giving me 2 perfect babies, working so hard in school and work that I can be a stay-at-home mom, buying and fixing up multiple houses, and making me laugh a whole lot.  But, one of the best things he has ever done for me personally, was win me a Kitchen Aid Mixer.  That was pretty dang awesome of him.  

Everyone raise your virtual hand if you read Our Best Bites!  If you have your hand down, I'm telling you right now that you should!  They not only share amazing recipes, but are laugh-out-loud funny!  I strongly recommend.  Anyhow, for those that don't know, about 6 months ago their second cook book was released.  To celebrate, they hosted a contest where you were to photograph yourself with a picture of the new book and send it in to them to be judged.  The best, most creative pictures would then be selected to receive prizes.  I told Jason about it, but also included that I had no ideas to make myself stand out.  He, however, has never backed down from a challenge, and viewed this as such.  So he came up with this...


And we won!!  Thanks to his creative mind and shameless desire to make people laugh, I now own a shiny red Kitchen Aid mixer (and there is this lovely picture floating out there in blog land for all the world to see)!  See, he really is the best!!  So happy birthday to him!

Okay, so I was getting to the recipe.  These Mini Puffed Oven Pancakes are one of our very favorite recipes out of that Our Best Bites Cookbook.  They are amazingly simply and incredibly delicious.  Last time I made these, I had to whip up a second batch immediately because we devoured them so quickly! Then those disappeared just as fast.  Jason loves them so much that he requested them for his birthday breakfast yesterday and we almost needed a third batch!  


Mini Puffed Oven Pancakes

1/2 cup flour
3/4 cup milk
2 large eggs
1/8 teaspoon salt
2-3 Tablespoons butter, melted
Powdered sugar
Whipped cream, optional

Place a nonstick mini muffin pan in the oven and heat to 400 degrees.  Meanwhile, place the flour, milk, eggs and salt in a blender and blend until mixture is smooth.  Remove the pan from the oven, doing so very carefully and with an oven mit, as the pan with be very hot.  Quickly spray the wells with nonstick spray.  Fill the muffin wells 3/4 full with batter.

Bake for 12-18 minutes, until batter is puffed and slightly golden on top.  Remove the puffs and place on a plate or platter.  Drizzle with melted butter and sprinkle with powdered sugar.  Drizzle with maple syrup or strawberry sauce and whipped cream, or eat them alone with your fingers!  All ways are equally delicious!

Strawberry Sauce

3 cups frozen strawberries
2 Tablespoon sugar

Place strawberries and sugar in a small saucepan and stir over medium heat until the strawberries release their juices, about 5 minutes.  Cook for 1-2 minutes longer, stirring continuously and smashing berries slightly with a fork.  Serve over pancake puffs.

Recipe Source:  Pancake Puffs from Our Best Bites.  Strawberry Sauce from The Unsophisticated Kitchen

I like to party here!

Friday, April 19, 2013

Marsala Pork Chops


This recipe is a good one!  I love these pork chops!  However, I probably should have changed the name to something else.  The original recipe called for Marsala wine, but I don't keep wine on hand, so I improvised and adapted the recipe slightly to what I had.  Yep, I pushed the marsala right on out of there.  But I couldn't think of a better name...so Marsala it is, but isn't...get it?!  Good.  Name aside, this is a truly delicious meal.  It has only been the last few years that I have discovered a deep love of onions and this meal definitely caters to that taste.  If you love onions and garlic, you will adore this meal.  If you don't...well skip over this one and I'll have something for you non-onion lovers in the next few days!  

Marsala Pork Chops

1/2 cup seasoned bread crumbs
4 pork loin chops (the original recipe says bone-in, I use boneless)
3 Tablespoons olive oil, divided
3 medium onions, thinly sliced
6 garlic cloves minced
1/2 cup chicken broth
1/4 teaspoon peper
1/8 teaspoon salt
1/4 cup cold butter cubed
Hot cooked egg noodles

Place bread crumbs in a large resealable plastic bag.  Add pork chops, one at a time and shake to coat.  In a large skillet, cook pork chops in 2 tablespoons of oil over medium heat for 4-6 minutes on each side or until a meat thermometer reads 160 degrees.  Remove and keep warm.

In the same skillet, sauté onions in remaining oil until tender.  Add garlic and cook for 2 minutes longer.  Add the chicken broth, pepper and salt, stirring to loosen browned bits from the pan.  Cook, stirring occasionally until liquid is nearly evaporated.  Stir in butter until melted.  Serve over pork chops and noodles.

Recipe Source:  Adapted slightly from Taste of Home
I link up at these parties!

Tuesday, April 9, 2013

Open-Faced Chicken Avocado Burgers


I first made these open-faced burgers about 3 years ago when I really started getting serious about learning how to cook.  I remember looking at the recipe and being totally overwhelmed with the list of ingredients and I remember that it took, what seemed to me, a very long time to throw them together.  I even went to a specialty store to look for the ground chicken because I was sure that the regular grocery store wouldn't carry it.  Well, after all the work I thought I put into them I was delighted at how delicious they were!  The avocado dressing sauce was tangy and delicious and took what could be just a regular old burger over the top!  Even though I loved these and thought they were one of the best things I had made yet, I didn't make them again until just a few weeks ago.  The only reason being that I remembered them to be way too much work!  But when I was at Walmart the other day and spotted the ground chicken (that I thought was some crazy uncommon ingredient), I had a sudden strong desire to make them.  So I pulled out the recipe when I got home, and I actually laughed out loud at myself.  I couldn't believe that I thought these were so difficult to make!  It showed to me how far I have traveled in my culinary journey, because things that once seemed so overwhelming and difficult to me, now seem like a piece of cake!  Beautiful in their presentation, these are an easy and delicious spin on the classic burger! 

Open-Faced Chicken Avocado Burgers

Avocado Sauce:

1 Tablespoon lemon juice
1/4 teaspoon Worcestershire sauce
1/2 medium ripe avocado, peeled
1/2 cup mayonnaise
1/4 cup sour cream
4 green onions, coarsely chopped
1/2 teaspoon salt
1/2 teaspoon cayenne pepper

Burgers:

1/4 cup shredded Parmesan cheese
2 Tablespoons prepared pesto
3 garlic cloves, minced
1/4 teaspoon salt
1 pound ground chicken
4 Tablespoons olive oil, divided
1/2 pound fresh mozzarella cheese, cut into 4 slices
4 slices Italian bread (3/4 inch thick)
2 cups fresh arugula or fresh baby spinach
8 slices tomato
1/4 teaspoon dried basil
1/4 teaspoon pepper

In a blender, combine the first eight ingredients; cover and process until smooth.  Chill until serving.  For burgers, in a small bowl, combine the Parmesan cheese, pesto, garlic and salt.  Crumble chicken over mixture and mix well.  Shape into four patties.

In a large skillet over medium heat, cook burgers in 2 Tablespoons of oil for 5-7 minutes on each side or until a meat thermometer reads 165 degrees and juices run clear.  Top with cheese; cover and cook for 1 minute longer.  

Meanwhile, brush the bread with remaining oil and place on a baking sheet.  Broil 3-4 inches from heat for 1-2 minutes on each side or until toasted.  

Spread each slice of toast with 2 Tablespoons of the avocado dressing (refrigerate the remaining sauce for another use...I have used it on sandwiches and other hamburgers).  Top the slices of bread with the spinach, a burger and sliced tomato.  Sprinkle each burger with basil and pepper.  Serve.

Recipe Source:  Taste of Home


I like to link up at these parties!

Tuesday, April 2, 2013

Chocolate Lover's Dream Cookies


It has been nearly another week since my last post!  Am I the only one that ever feels like life is impossible to catch up on?!  I know I'm not, but for some reason right now that is where I am at.  I can't seem to get my head on straight lately!  And time is just flying by!  I don't know if I have mentioned this before, but my husband is graduating from dental school next month and we are moving our little family clear across the country to Chattanooga, Tennessee!  We are super excited about this new adventure we are about to embark on, but also really overwhelmed at what it takes to make a move of this magnitude!  We are also really sad to be leaving this city in Arizona that we have made our home.  Needless to say the next 8 weeks of life are going to be full of stress, anxiety and lots of other emotions.  To get me through this phase, I am going to need lots of sugary, rich desserts...just like these chocolate lover's dream cookies.  These are delicious little morsels of chocolatey goodness!  As the name implies, they are chalk full of chocolate...a base that delightfully tastes like a chewy brownie,  dotted with chunks of my personal favorite, white chocolate chips and then of course, semi-sweet (or in my case, milk chocolate) chips as well!  Perfect!  It took me about 10 cookies, before I realized that these were infinitely better when dipped in a cold glass of milk!  They were super easy to throw together and are literally a chocolate lover's dream cookie! 

Chocolate Lover's Dream Cookies

6 Tablespoons canola oil
1/4 cup butter, softened
3/4 cup packed brown sugar
1/2 cup sugar
2 eggs
1 teaspoon vanilla extract
1-1/4 cups all purpose flour
1/2 cup baking cocoa
1/4 teaspoon baking powder
1 cup vanilla or white chocolate chips
1 cup semisweet chocolate chips (I used 1/2 milk chocolate and 1/2 semisweet & loved the result)

Preheat oven to 350 degrees.

In a large bowl, beat the oil, butter and sugars until well blended.  Add eggs, one at a time, beating well after each addition.  Beat in vanilla.  Combine the flour, cocoa and baking powder in a medium bowl; gradually add to oil mixture and mix well.   Stir in both kinds of chocolate chips.

Drop by rounded tablespoonfuls 2 inches apart onto greased baking sheets or baking mat.  Bake for 12-15 minutes or until edges begin to brown.  Do not over bake!  Cool for 1 minute before removing from pans to wire racks to finish cooling.

Recipe Source:  Taste of Home

I am linking up at these great parties!

PS...How was your Easter?!  Ours was fantastic!  We attended church, had friends over for dinner and dessert, and just spent time together as a family.  It was a really nice weekend for us!  Though this has nothing to do with food, other than the fact that Easter is a day to eat an amazingly delicious meal, I had to share this picture of my sweet kids in their Easter best!  My 2 year old is a bit of a stinker and REFUSED to let me take a good picture of her, so this one featuring her non-smiling glare, is literally the best one I got!  I hope your Easter was as good as ours!

Thursday, March 28, 2013

Terrific Turkey Enchiladas

                           
Well, I inadvertently took more than a week off of blogging.  Between parent teacher conferences, a visit from my family from Idaho, and closing on our house, this past week was crazy busy!  It flew by without me even realizing it!  In fact this whole month has!  Just minutes ago, a flier fell out of my cupboard for an event that I planned to attend...on March 9th.  I thought for a second about what day it was and could not wrap my mind around the fact that it had taken place almost 3 weeks ago!  Time is flying by too fast for me right now!  

Anyhow, I am back with a delicious recipe for some hearty Mexican food.  I love Mexican food!  I mean, you cannot go wrong with melted cheese, and I do not know about you, but I don't believe I have ever eaten Mexican anything that wasn't smothered in cheese!  I'm not big on spice, in fact, often times I can't even hack mild salsa, so you can rest assure that anything I post will not pack a huge punch...just in case you can't handle the spice like me.  These enchiladas have a white sauce, which I much prefer over the red stuff, but I had only ever had when stuffed with chicken (which I also love!!).  These enchiladas break the mold in that they are made with ground turkey.  I really enjoyed this dinner!  It seems like there are a ton of ingredients but they really do come together fairly easily, so don't fret!

Terrific Turkey Enchiladas

1-1/4 cups frozen corn, thawed
1 can (4 ounce) chopped green chilies
1 cup fresh cilantro leaves (I have to leave these out due to my husband's pure hatred...I am jealous of anyone that can add these in)
1/3 cup heavy cream
1/4 teaspoon salt
1/4 teaspoon pepper

Enchiladas

3/4 pound ground turkey
1/3 cup chopped onion
1 garlic clove, minced
1 Tablespoon olive oil (Optional.  I left out because I feel there is enough grease coming off the turkey.)
3/4 cup salsa
1 Tablespoon cornmeal
2 teaspoon chili powder
1-1/2 teaspoon ground cumin
1 teaspoon dried oregano
1/8 teaspoon salt
1/8 teaspoon pepper
6 flour tortillas (8 inch)
1-1/4 cups shredded Mexican cheese blend, divided
1/4 cup sliced ripe olives (Optional...I left these out due to my pure hatred)

Place the first six ingredients into a food processor; cover and pulse until blended.

In a large skillet, cook the turkey, onion and garlic in oil over medium heat until the meat is no longer pink.  Remove from the heat, stir in the salsa, cornmeal and seasonings.  Spoon 1/3 cup turkey mixture down the center of each tortilla; top with 2 Tablespoons of cheese.  Roll up and place seam side down in a greased baking 9x13 inch baking dish.  Spoon corn mixture over the top.  Sprinkle with olives (if using) and remaining cheese.  

Cover and bake at 350 degrees for 30 minutes.  Uncover; bake 5-10 minutes longer or until heated through.

Recipe Source:  Taste of Home

I am linking up at these delightful parties!

Wednesday, March 20, 2013

Chicken Caesar Salad Wraps

One of my most favorite fast food restaurants in the world to eat at is New York Burrito.  I don't know if it is a big chain or anything, but I have yet to encounter one in Phoenix, which basically has everything (except for Cafe Rio, Wingers and Maurice's...at least not anywhere near me.)  But there was one in my lovely hometown, and going back to Pocatello for visits, always meant a stop at New York Burrito for a chicken caesar wrap.  Until it closed down about a year ago.  It was heartbreaking news to me.  Every time I am home for a visit and I drive past the old building, I mourn.  They really did have the best wraps of all time.  As I mentioned before, my very favorite was the chicken caesar.  I have tried many times to recreate that wrap, with only sub par results.  Don't get me wrong, anything smothered in caesar dressing can't be bad, but they just never compared to that.  Then I found the recipe for this wrap and knew I wanted to make it immediately.  And I am in love.  It is super simple and you probably have most or all of the ingredients on hand already.  Now, it isn't quite the same as NY Burrito, but it is amazingly delicious and maybe one of my favorite new meals.  I saved the leftovers, and even with the lettuce having wilted a bit, it was still yummy enough that I had a wrap for both lunch and dinner the next day!  The whole in my heart from the absence of New York burrito isn't entirely healed, but this recipe has helped quite a bit and for that I am thankful:).

Chicken Caesar Salad Wraps

The original recipe called for 1 (2.5 pound) rotisserie chicken.  I just boiled several chicken breasts in chicken broth and then shredded them afterwards.  So you could do either.  Obviously a rotisserie chicken would make this even easier.  I have included that change in the recipe.

1/4 cup light or regular mayonnaise
1/4 cup grated Parmesan cheese
2 tablespoons fresh lemon juice (from about 1 large lemon) I used bottled lemon juice with amazing results
1 tablespoon Worcestershire sauce
1 tablespoon Dijon mustard
1 garlic clove, finely minced
1/4 cup olive oil
3 cups cooked chicken  
1 Romain lettuce heart (about 6 ounces), torn into bite sized pieces
4-6 (10 inch) tortillas or wraps (I have used both whole wheat, white tortillas and soft wrap bread...all work wonderfully)

In a small bowl, whisk together the mayonnaise, Parmesan cheese, lemon juice, Worcestershire sauce, mustard and garlic.  Whisk in the olive oil slowly until thouroghly incorporated.  

In a large bowl, toss the chicken and lettuce with the dressing.  Divide the chicken/lettuce mixture evenly among the tortillas or wraps.  Roll and secure with a toothpick, if desired.  Serve.  

Recipe Source:  Slightly adapted from Mel's Kitchen Cafe who adapted it from Cook's Country

I am linking up at these parties!

Sunday, March 17, 2013

Chocolate & Peanut Butter Mousse Cheesecake

Are you looking for a crazy, decadent, over-the-top in deliciousness, dessert?  Well then look no further.  Seriously.  I have you covered right here.  This cheesecake is heaven.  I am a lover of all things  peanut butter and chocolate (who isn't though, right?!), so this was right up my alley.  You know, when my husband and I were dating, he claimed to be a hater of cheesecake.  I thought he was completely nuts and it was almost a deal breaker for me.  I mean, how could I be with someone who wouldn't share a slice of cheesecake with me?!  Thankfully, I have since converted him (yeah, I'm taking credit for it) and he now loves it...as long as it is high quality and totally rich.  And let me tell you, he loved this!  He even had a piece for his after-church snack today and he does NOT do left overs of any kind!  My favorite part was the peanut butter mousse.  It balanced perfectly with the rich chocolate and ganache layers to create a little bit of heaven in every bite.  Make this as soon as you can, but make sure you have someone to share it with...and maybe a tall glass of milk.  This is insanely delicious!  You will love it!

Chocolate & Peanut Butter Mousse Cheesecake

1-1/2 cups chocolate sandwich cookie crumbs (like Oreos)
1/4 cup butter, melted

Mousse Layers
3/4 cup creamy peanut butter
5 ounces cream cheese softened
2 Tablespoons butter, softened
1-1/4 cups confectioners' sugar
1-1/4 cups heavy cream, whipped, divided
5 ounces bittersweet chocolate, chopped
1 milk chocolate candy bar (3.5 ounce), chopped
1/3 cup sugar
1/4 cup milk
1 teaspoon vanilla extract

Ganache
6 ounces bittersweet chocolate, chopped
2/3 heavy cream
1 teaspoon vanilla extract

In a bowl, combine cookie crumbs and butter.  Press onto the bottom of a greased 9-inch springform pan.  In a bowl, beat the peanut butter, cream cheese and butter until smooth.  Add confectioners' sugar and beat until smooth.  With a spatula, fold in 1-1/4 cups of the whipped cream.  Spread over crust.

Place bittersweet and milk chocolate in a bowl.  In a small saucepan, bring sugar and milk just to a boil.  Pour over chocolate and whisk until smooth.  Stir in vanilla.  Cool to room temperature.  Gently fold in remaining whipped cream.  Spread over peanut butter layer.  Cover and freeze for 2 hours or until firm.  

For ganache, place chocolate in a bowl.  In a small saucepan, bring heavy cream just to a boil.  Pour over chocolate and whisk until smooth.  Stir in vanilla.  Cool to reach spreading consistency, stirring occasionally.  Spread over cheesecake.  Refrigerate until set.  With a knife, loosen cheesecake from the springform pan and remove rim.  Serve.  Refrigerate leftovers.

Recipe Source:  Adapted from Taste of Home

 I am sharing this recipe at these great link parties!

Tuesday, March 12, 2013

Tomato Cream Soup

As I mentioned last week, my family has been hit hard with sickness.  My kids had it, my husband had it, and after 2 weeks, I still have it!  I have had enough of this little bug and can't wait to kick it!  On the day that my husband was at his worst, I knew that the only thing that he would be able to handle for dinner, would be a nice hot bowl of soup.  But since I was still not feeling fabulous, I wanted something easy and fast.  This recipe fit the bill for all of those things.  I whipped it up in a matter of minutes and served along side a hot grilled cheese sandwich, it was the perfect meal for all of us sickies around here!  My husband especially liked this soup.  You can never have too many soups in your file and one that is as easy and painless as this, is even better!  

Tomato Cream Soup

2 cups milk
1 can (14.5 ounce) diced tomatoes, undrained
1 package (8 ounce) cream cheese, softened (I used light with stellar results)
1/4 cup coarsely chopped fresh basil
1/2 teaspoon salt
1/8 teaspoon pepper

Place all ingredients in a blender.  Cover and process until smooth.  Transfer to a large saucepan and heat through.  Serve warm. 

Recipe Source:  Taste of Home
I am linking up at these great parties!

Sunday, March 10, 2013

Caprese Chicken with Bacon

I adore the flavors of caprese!  I love the fresh taste of basil and tomato together, and mozzarella is my very favorite type of cheese.  Now throw some bacon to the caprese mix and holy cow, we have a major winner!  This dinner is so simple, so fresh, so beautiful and so delicious!  It really couldn't be easier to throw together and my house always smells divine while its baking.  I love this dish and I think that you will too!

Caprese Chicken with Bacon

8 strips of bacon
4 boneless skinless chicken breast halves
1 Tablespoon olive oil 
1/2 teaspoon salt
1/4 teaspoon pepper
2 plum tomatoes, sliced
6 fresh basil leaves, thinly sliced
4 slices mozzarella cheese

Preheat oven to 400 degrees.  Place bacon in an ungreased baking dish.  Bake for 8-10 minutes or until partially cooked but not crispy.  Remove to paper towels to drain.  Place chicken in an ungreased 13x9 baking dish.  Brush chicken with oil and sprinkle with salt and pepper.  Top with tomatoes and basil.  Wrap each breast in two bacon strips, arranging bacon in a criss-cross.  Bake uncovered, at 400 degrees for 20-25 minutes or until a meat thermometer reads 170 degrees.  Top with cheese and bake 1 minute longer or until melted.  

Recipe Source:  Taste of Home
I am linking up here!

Tuesday, March 5, 2013

Peanut Butter-Banana Whoopie Pies

My family has been hit majorly hard with a bug this past week!  I was sick the entire time we were in Disneyland!  We have been home for days and I still can't kick this thing!  I was even stuck in bed on my birthday for the whole day!  I didn't even have the strength to make myself a cake!  It was a sad sad way to enter the last year of my 20's!  I guess I will just have to find another excuse to make a decadent and yummy dessert!  Anyways, this sickness has caused me to be useless in about every facet of life right now...except laying on the couch and ingesting rather large amounts of popsicles...I've got that down okay.  I have not cooked a real meal for my family in what seems like an eternity!  I'm hoping to get back to that tomorrow.  So for tonight I will leave you with these delightful little whoopie pies that I baked up several weeks ago.  I think peanut butter and banana are a match made in heaven and these combine both flavors perfectly.  This was my first experience with whoopie pies and I thought they were a pretty fun little treat to throw together, and I'm excited to try out many more combinations!  Enjoy!

Peanut Butter-Banana Whoopie Pies

1/2 cup butter, softened
3/4 cup sugar
1/4 cup packed brown sugar
1 egg
1 teaspoon vanilla extract
1/2 cup mashed ripe banana
1/2 cup buttermilk
2 cups all-purpose flour
1/2 teaspoon salt
1/2 teaspoon baking powder
1/2 teaspoon baking soda

Filling:
1 package (8 ounce) cream cheese, softened
1 cup creamy peanut butter
3 Tablespoon butter, softened
1 cup confectioners' sugar
1 teaspoon vanilla extract
Additional confectioners' sugar

Preheat oven to 350 degrees.  Line a baking sheet with parchment paper and set aside.  In a large bowl, cream butter and sugars until light and fluffy.  Beat in egg and vanilla.  In a small bowl, combine banana and buttermilk.  Combine the flour, salt, baking powder and baking soda.  Gradually add to creamed mixture alternately with banana mixture.  Drop by tablespoonfuls 2 inches apart onto parchment paper-lined baking sheets.  Bake for 12 to 15 minutes or until set.  Cool for 2 minutes before removing from pans to wire racks to cool completely.  For filling, in a large bowl, beat cream cheese, peanut butter and butter until fluffy.  Beat in confectioners' sugar and vanilla until smooth.  Spread filling on the bottoms of half of the cookies, about 1 Tablespoon on each.  Top with remaining cookies.    Dust with additional confectioners' sugar.  Store in the refrigerator.  I would suggest removing pies from the fridge about 10 minutes before consuming. They are much more delicious when closer to room temperature than cold.

Recipe Source:  Taste of Home

I am linking up at these great parties!

Sunday, March 3, 2013

Sausage & Pepper Chip Dip

Not so long ago, I was sure that I hated sausage and peppers.  I mean, I have spent my whole life thinking that I despised both, right along with mustard, ketchup and mushrooms.  So as a general rule I pretty much steered clear of any food items, that included either of those ingredients.  For about a year my husband begged me to make him some incredible chip dip that my mom had made "about a million times" (he said).  I honestly and truly had zero idea what he was talking about.  Even as he described it, I thought for sure he was making things up because I had never so much as laid eyes on what he was talking about.  I finally called my mom on the off chance that she would have any idea what this was and sure enough, she did.  And she apparently had made it on several occasions in which I was in attendance.  But because of my pepper and sausage hating ways, I just skipped right over it without paying it any ounce of attention at all.  Finally having the recipe in hand, I made this for Jason and some friends several times before I finally relented and gave it a try myself.  One bite and I was hooked.  For a moment, all was right in the world and I wondered how I had willingly skipped over this dip for years and years.  No matter, I have definitely made up for the lost time by now.  We make this for every football party, family get together and holiday.  We love it!  I love it!  I, the sausage-loathing, pepper-hating, spicy-fearing woman, could eat this every day!  It really is that good.  Not convinced yet that a dip can change your life...make this.  I dare you.

Sausage & Pepper Chip Dip

5-6 medium size peppers, using a combination of red, yellow and orange
1 can Rotel tomatoes with green chiles
1-16 ounce container of sour cream (I always use light with excellent results)
1-8 ounce package cream cheese (I always use light with excellent results)
1 pound spicy pork sausage
1 pound mild pork sausage

Brown sausage in a large skillet over medium high heat.  When completely browned, drain fat and place sausage in a 5 or 6 quart slow cooker.  Wash peppers and roughly chop them.  Place them in slow cooker with the browned sausage.  Add the tomatoes, sour cream and cream cheese to slow cooker.  Stir until combined.  Cover and let cook on high for about 45 minutes to an hour or until peppers are soft and dip is warmed through.  We have also cooked this on the stove top when we needed it in a hurry and it worked great as well.  Serve with tortilla chips.  

Recipe Source:  My really great mom Kris
This recipe can be found linked up at these great parties!

Tuesday, February 26, 2013

Gnocchi Chicken Minestrone


I, my friends, am just hours away from leaving this sunny place I live in, to head to yet another sunny place, that is Southern California!  We are taking our kids on a last minute surprise trip to Disneyland and I could not be more excited!  Mostly I can't wait to see their sweet faces tomorrow morning when they realize where we are and what we are doing!  If this trip had not been planned last minute, I never would have been able to keep it from them!  I have just about spilled the beans a dozen or more times!  Speaking of beans, I have a tasty soup to share with you today, chalk full of hearty and healthy things like beans, peppers, zucchini, chicken breasts, peas, and potato gnocchi.  In case you are not privy as to where in the grocery store gnocchi is found, as I was not, you can find look for it in the pasta or frozen foods section.  So for those of you who are not leaving one sunny place for another, and are still stuck behind closed doors because of freezing temperatures and/or inches of snow, (I'm talking to you my hometown folks in good old Pocatello, Idaho), then this soup is for you!  Served up with some Parmesan bread sticks, this is the perfect cold-weather, comfort meal.  

PS...I have heard so much about the fantastic food at Disneyland, and even though I have been there more than half a dozen times, I have yet to discover any of these culinary treasures.  Does anyone have any recommendations for must-eat meals or restaurants in Disneyland?!  Please let me in on any secrets you might have!!  Thanks a million!  


Gnocchi Chicken Minestrone

1-1/4 pounds chicken tenderloins or breasts, cut into 1/2 inch pieces
3/4 teaspoon dried oregano
1/4 teaspoon salt
1/4 teaspoon pepper
2 Tablespoons olive oil, divided
1 small green pepper
1 small red pepper
1 small yellow pepper
1 medium zucchini, finely chopped
1/3 cup chopped red onions
1/3 cup chopped prosciutto or deli ham
4 garlic cloves, minced
2 cans (14.5 ounce each) chicken broth
1 can (14.5 ounce) Italian diced tomatoes, undrained
3.4 cup canned white or kidney or cannellini beans, rinsed and drained
1/2 cup frozen peas
3 Tablespoons tomato paste
1 package (16 ounce) potato gnocchi
1/2 cup shredded Asiago or Italian blend cheese
8 fresh basil leaves, thinly sliced

Sprinkle chicken with oregano, salt and pepper.  In a skillet, saute chicken in 1 Tablespoon oil until no longer pink.  Remove from pan and set aside.  In the same pan, cook the peppers, zucchini and onion in remaining oil until tender.  Add prosciutto and garlic, and cook 1 minute longer.  Transfer vegetables to a soup pot.  Add the broth, tomatoes, beans, peas and tomato paste and chicken.  Bring to a boil. Reduce heat and simmer, uncovered for 20 minutes, stirring occasionally.  
Meanwhile, cook gnocchi according to package directions.  Drain and stir into soup.  Garnish each serving with cheese and basil.  

Recipe Source:  Adapted from Taste of Home

I like to link up to some fun parties!  Check them out here!

Sunday, February 24, 2013

Coffee Cake Muffins

It is very unlike me to post two sweet treats right in a row.  However, these muffins were just so amazingly delicious, that I thought it would be quite unfair of me not to share them with you as soon as possible!  Coffee cake is one of my most favorite things in the whole world!  Anything topped with streusel is a-ok with me!  So when I found the recipe for these muffins that not only had a an amazingly delicious pecan streusel topping, but also had a ribbon of streusel tucked inside, I knew I had to make them immediately.  After my husband ate one of these this afternoon, he declared them the best muffin I have ever made!  I won't divulge to you how many of these things I ate because I would be embarrassed, but I am telling you that you should make them right away.  They were so so good.

Coffee Cake Muffins

Makes 12 muffins (I actually only got about 9 but I made mine pretty big)

Streusel topping:
3 Tablespoons all-purpose flour
3 Tablespoons brown sugar
1/4 teaspoon ground cinnamon
2 tablespoons butter or margarine
3 tablespoons chopped walnuts or pecans

Muffins:
1-1/2 cups all-purpose flour
1/2 cup granulated sugar
1-1/4 teaspoons baking powder
1/2 teaspoon ground cinnamon
1/4 teaspoon ground ginger
1/4 teaspoon baking soda
1/4 teaspoon salt
1/4 cup butter or margarine
1 beaten egg
1/2 cup buttermilk

Preheat oven to 400 degrees.  Grease twelve muffin cups or line with paper baking cups and set aside.  For topping, in a small bowl stir together the 3 tablespoons flour, brown sugar and the 1/4 teaspoon cinnamon.  Cut in the 2 tablespoons butter until mixture resembles coarse crumbs.  Stir in the nuts, set topping aside.

In a medium bowl, stir together the 1-1/2 cups flour, granulate sugar, baking powder, the 1/2 teaspoon cinnamon, ginger, baking soda and salt.  Cut in the 1/4 cup butter until mixture resembles coarse crumbs.  

In another bowl, combine egg and buttermilk.  Add egg mixture all at once to flour mixture.  Stir just until moistened (batter should be lumpy and pretty sticky).

Spoon half of the batter into the prepared muffin cups, filling each one-third full.  Top with half of the streusel topping, then the remaining batter and the remaining topping.  Bake for 15 to 18 minutes or until golden and a wooden toothpick inserted in center comes out clean.  Cool in muffin cups on wire rack for 5 minutes.  Remove from muffin cups, serve warm.

Recipe Source:  Better Homes and Gardens
I'm linking this recipe up here!

Thursday, February 21, 2013

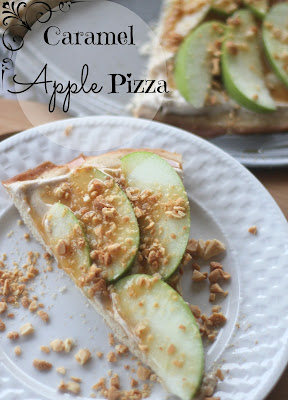
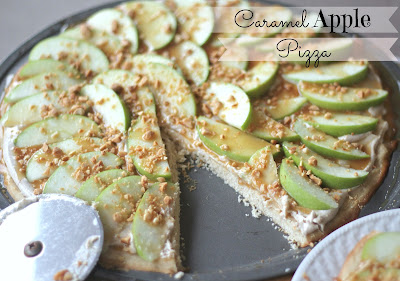
Caramel Apple Pizza

Let's talk favorites here for a minute.  Have you ever been to a favorite things party?  Tonight I attended my second one ever.  They are great.  Let me tell you about them just in case you haven't been.  Each party-goer picks something that is their favorite, then purchases 5 of that item.  Our limit tonight was $5, but it could be set either higher or lower.  Then each person puts their name into a box 5 times.  The box is passed around the room to each person and when it arrives in your lap, you explain a little about your favorite item, draw out 5 names and hand over your favorite thing to each of those 5 people.  So each person leaves the party with 5 different things!  So fun!  I left with some real treasures tonight!  If you haven't been to one of these parties, you should totally throw one yourself.  They are a blast!  So I took some fun Ikea kitchen tools as my favorite items tonight.  But another favorite that I have is pizza.  Even after working at 2 different pizza restaurants for a combined total of nearly a decade, I could still eat it just about everyday!  I have another favorite...sugary sweets.  I am truly a sucker for anything packed with sugar.  This caramel apple pizza, though not your traditional pizza, fits the bill for both of my favorites.  Its a little twist on a classic favorite.  I made this for the favorite things party tonight.  You should make it for yours...that I know you are going to throw...because by now I have convinced you of how fun they are and you are dying to do it...right?!

Caramel Apple Pizza

*If you are like me and do not keep pastry flour around the house, fear not, you can easily substitute all purpose flour.  Just place 2 tablespoons of cornstarch into a 1-cup measuring cup.  Fill the rest with all purpose flour.  Sift the mixture into a bowl or onto a plate and then take your 1 cup of flour from that. That simply replaces the 1-cup whole wheat pastry flour, so make sure you still add the 3/4 cup all purpose flour as well, giving you a grand total of 1-3/4 cup flour.  Also, as I was taking this to a party I wanted to make sure my apples didn't turn brown.  There are a variety of ways to stop that from happening, but I just soaked mine in some lemon water and that worked perfectly.

Crust
3/4 cup butter, softened
1/4 cup sugar
1/4 cup packed brown sugar
1 egg
2 Tablespoons canola oil
1 Tablespoon light corn syrup
1 teaspoon vanilla extract
1 cup whole wheat pastry flour
3/4 cup all-purpose flour
1/2 teaspoon baking powder
1/4 teaspoon salt
1/4 teaspoon ground cinnamon

Topping
1 package (8 ounce) cream cheese
1/4 cup packed brown sugar
1/2 teaspoon ground cinnamon
1/2 teaspoon vanilla extract
3 medium granny smith apples, thinly sliced
1/4 cup caramel ice cream topping
1/4 cup chopped unsalted dry roasted peanuts

Preheat the oven to 350 degrees and grease a 140-inch pizza pan.  In a large bowl, cream butter and sugars until light and fluffy.  Beat in the egg, oil, corn syrup and vanilla.  In a medium size bowl, combine the flours, baking powder, salt and cinnamon.  Gradually add to creamed mixture and mix well.  Press dough onto a the pizza pan.  Bake for 12-15 minutes or until lightly browned.  Cool on a wire rack.  In a small bowl, beat the cream cheese, brown sugar, cinnamon and vanilla until smooth.  Spread over crust.  Arrange apples over the top.  Drizzle with caramel topping and sprinkle with peanuts.  Serve immediately.

Recipe Source:  Taste of Home Appetizers

I'm linking up at these parties!  Go check them out!

Tuesday, February 19, 2013

Rosemary & Garlic Pork Tenderloin

I have only recently discovered my love of the pork tenderloin.  For the longest time, I thought I was being locked out of some super secret club that knew something about pork tenderloin that I didn't.  I read recipe after recipe, blog post after blog post, about this favorite cut of meat that was not only lean, but also so tender and so delicious.  My experience in cooking a pork tenderloin had yielded a very different opinion than the aforementioned ones.  The only time I had ever cooked a tenderloin was many years ago, when I found a pre-marinaded one in the less than stellar meat section of a Walmart.  Not only was the marinade horrible and salty, I had overcooked it so the meat was dry and tough.  I had diligently avoided them since.   But after so many rave reviews on some of my favorite sites like Mel's Kitchen Cafe and Our Best Bites, blogs run by ladies whom I trust greatly when it comes to food, I decided to give it another go.  And I was smitten!  If cooked correctly, a tenderloin can give you the most moist, tender and flavorful, lean meat experience.  I have tried no less than 5 pork tenderloin recipes in the last 2 months and I have loved each and every one.  The pork tenderloin is so versatile and adaptable.  This recipe is the latest great one we have enjoyed in our home.  It is full of flavor, has only a few simple ingredients and comes together in a matter of minutes.  I served this with roasted asparagus and boiled and buttered red potatoes, and it was a perfect Sunday evening meal.  However, its so fast and easy that it would make a fabulous week night meal as well.

Rosemary & Garlic Pork Tenderloin

*Pork tenderloins generally come packaged by two's.  This recipe is for one 1-pound tenderloin but can be easily doubled to make both tenderloins.  

2 Tablespoons finely chopped fresh rosemary
4 garlic cloves, minced
1 (1 pound) pork tenderloin
1/2 teaspoon salt
1/4 teaspoon black pepper

Preheat oven to 475 degrees.  Combine rosemary and garlic.  Make several 1/2 inch deep slits in pork tenderloin.  Place about half of the rosemary and garlic mixture in the slits.  Rub the remaining mixture over the pork.  Sprinkle with salt and pepper.  Coat a jelly roll pan or roasting dish with cooking spray.  Place pork on the pan and insert a meat thermometer into the thickest portion of the pork.  Bake for 20 minutes or until thermometer registers 160 degrees (meat will still be slightly pink) or to a desired degree of doneness.  Let stand 5 minutes, and cut into 1/4 inch thick slices.

Recipe Source:  Cooking Light

I am linking up to these great parties!
Related Posts Plugin for WordPress, Blogger...